(a fictitious slice of Edwardian life in rural Eastern
Ontario)
Walsh Coal & Drayage
Patrick Walsh was a late
immigrant from Ireland arriving in 1901 joining relatives in Tyrone.
His family were merchants in Ireland and he continued in that way in Tyrone
establishing himself as the local coal dealer.
His business was the only rail served enterprise in the village so he
expanded his activities to include receiving and delivering shipments of
inbound freight.
An aerial look with the buck wagon and hatted horse having departed the scene.
And...a drone shot taken by my friend, Moe, with the buck wagon back in the scene.
Let's check back to the time the module first began taking shape. Note how the O-scale loading dock Doug had purchased incorporated a ramp that you see tailing off to the right of the image.
We chose to have a full height ramp across the diorama. Also note the freight shed which Doug had started in on before bringing it over to my place for me to finish the structure.
The simple addition of taping the cardboard roof to the structure allows us to see how it will look to some degree. Note too how the freight shed is elevated.
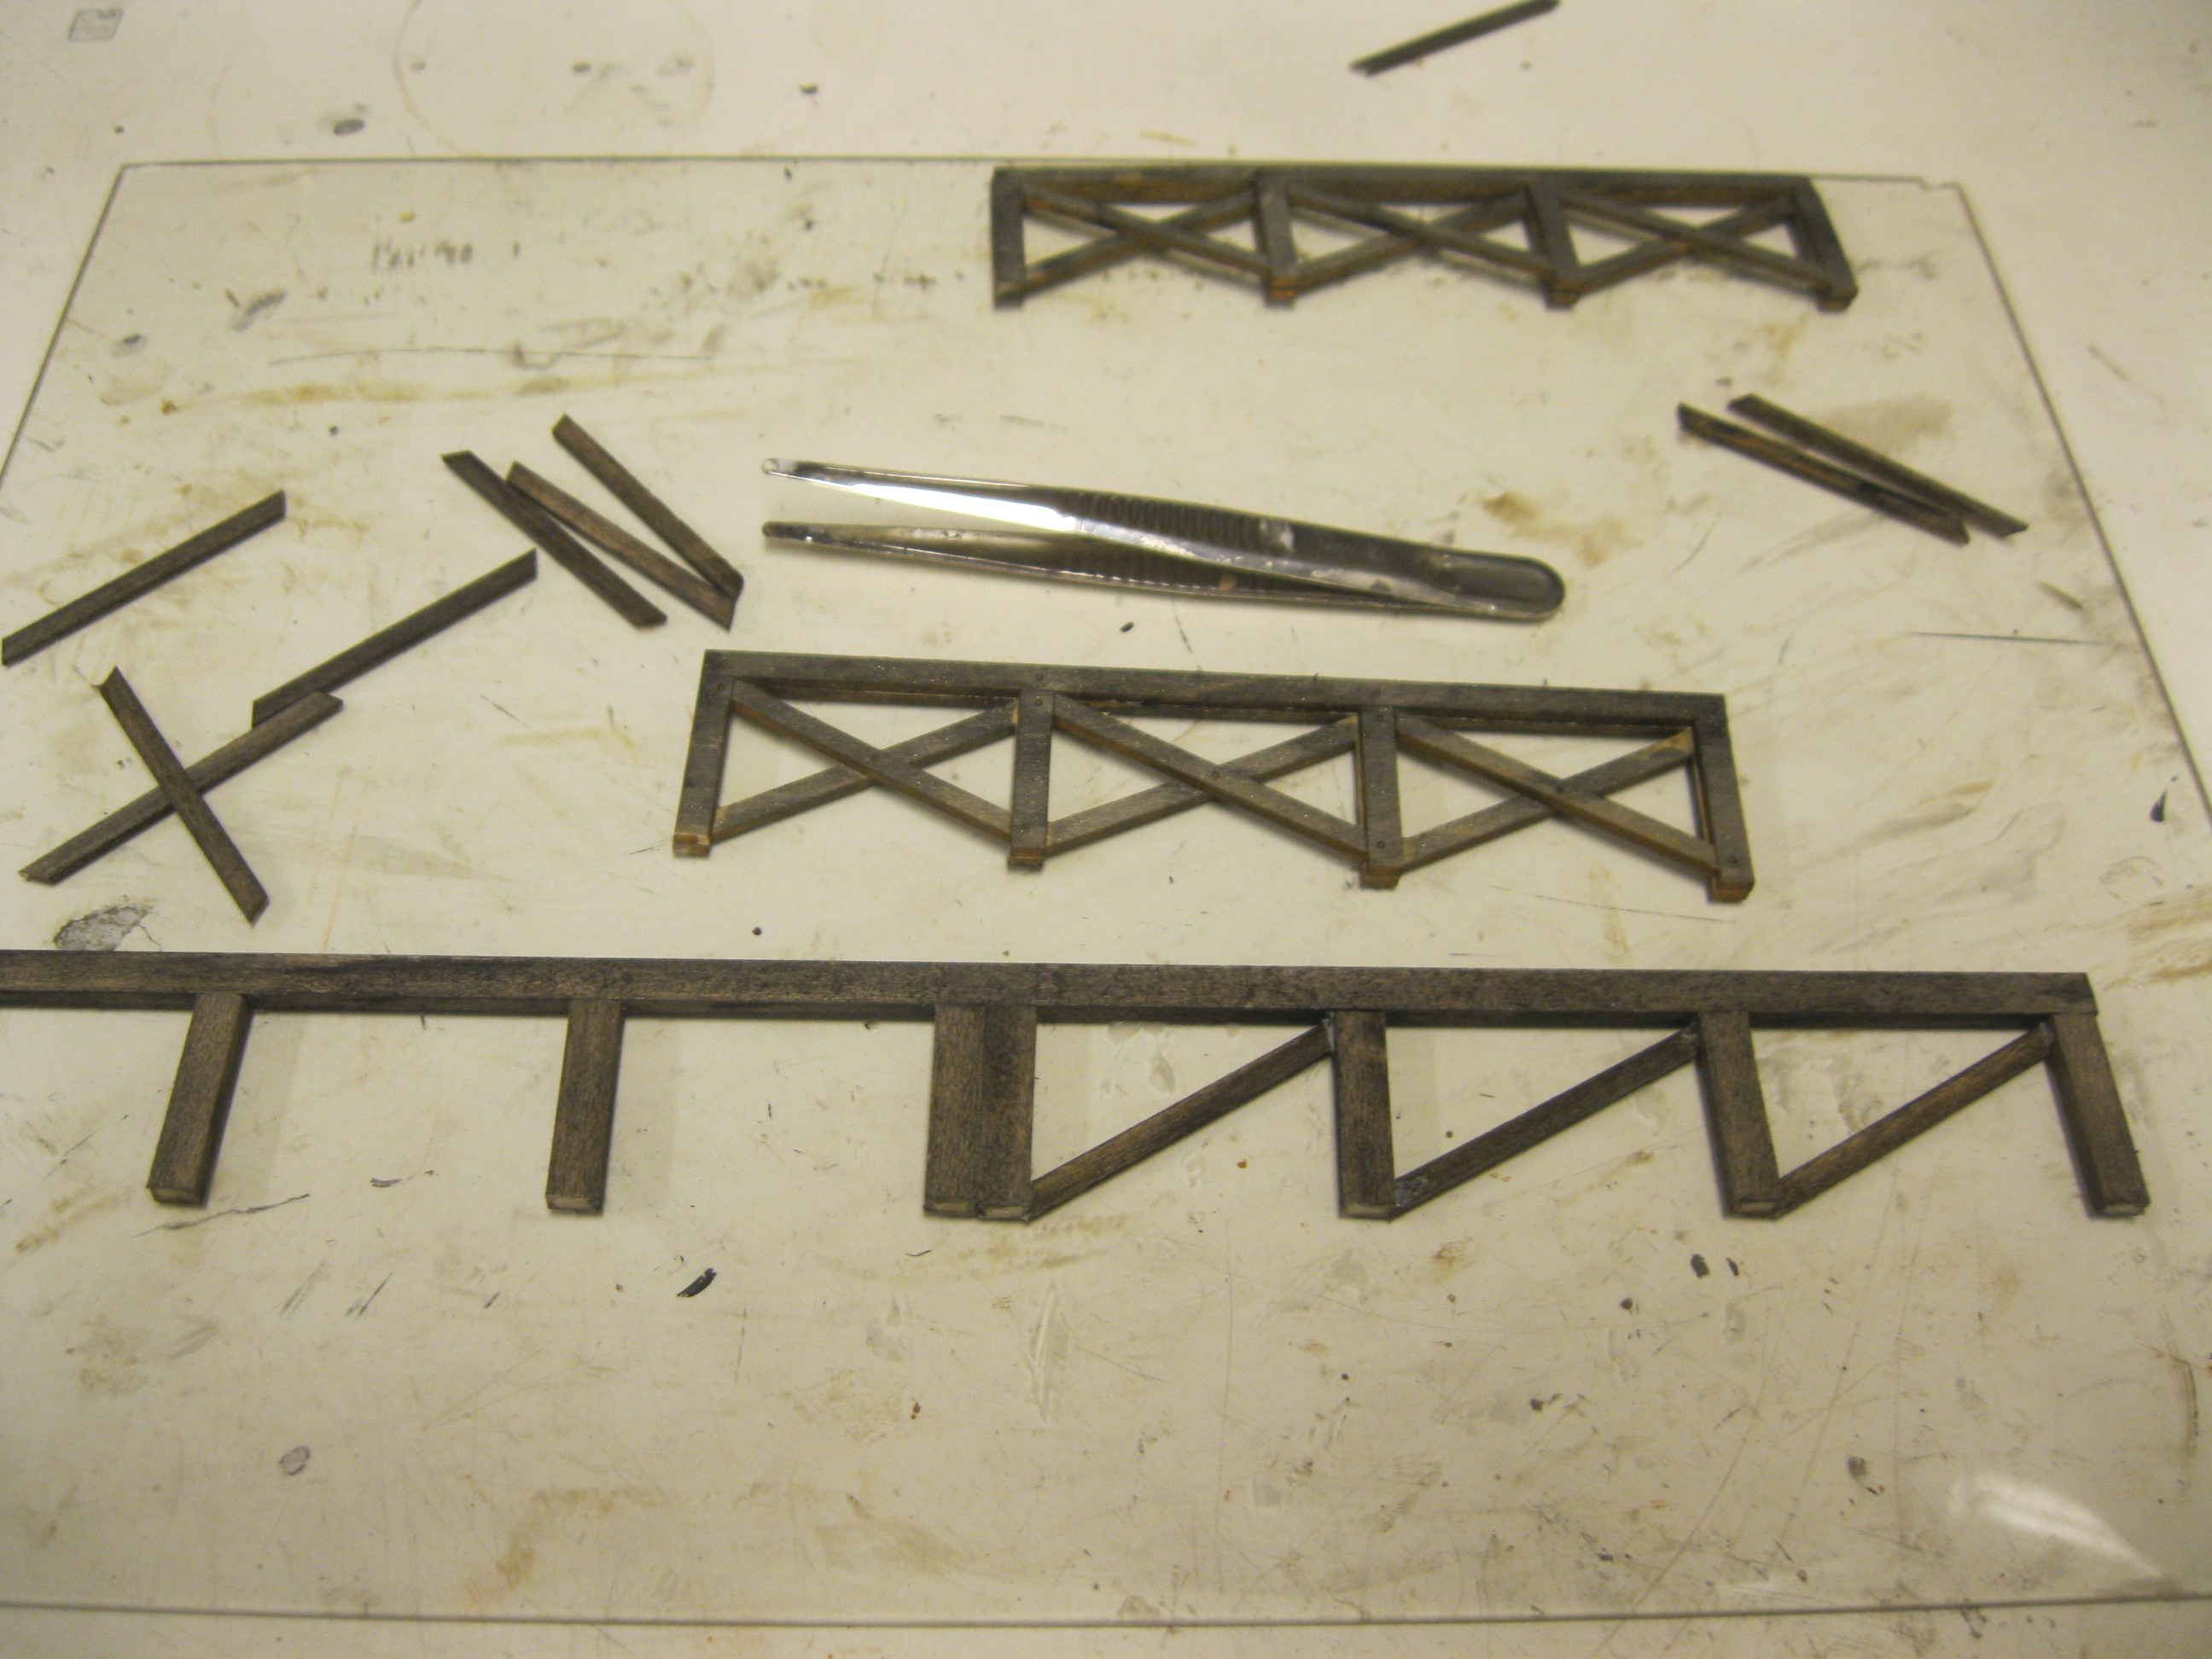
These are the supports for the original version of the loading dock with descending ramp which I had started to build before we decided to keep it all the same height.
No problem...with the addition of some other stripwood I was able to take the original design and duplicate the higher deck session.
The bracing is coming together.
Two full length sections are now built.
Time to glue them to the deck itself and place my heavier weights atop the structure until the glue sets.
A view of the underside where cross braces will be added at the ends and in a couple of places along the length of the structure.
Looking good!
This image shows just how effective these mini-clamps are when finicky items need to be held together until all of the glue dries.
I have now completed the loading dock and added a different colour ballast to the spur siding leading into the coal dealership.
I have also built and painted two more horses that make up the team for the coal cart. The ore cart will receive a sign in due course as well as some heavy weathering.
I have begun work on the roof of the structure and have built up the gondola with a load of coal...all separate and time consuming projects.
The gondola is an old Labelle kit from the 1960's. The underbody detail was a "work of art" with many tedious details. Thankfully, my old guitar strings came in handy here! Yes, the trucks will require weathering at some time in the future!
Because this kit came from way back in the sixties, I was uncertain as to the quality of the lettering. No worries...I later touched up the stencils with the same coloured paint.
My square assisted with the alignment of the stakes.
A cross-sectional view. The light brown floor will be painted the same boxcar oxide red colour so you will not notice any gap between the sides of the car and the main platform.
The brake wheel finds its location as do the angled side supports.
I really enjoyed this "side project".
A view from low down shows the weathered trucks.
The gondola is found at the depot for a quick photo session.
To create the coal load I simply carved a chunk of styrofoam to the desired shape.
I know that my nice painting and weathering job on the gondola floor will be hidden, so I made the load removeable.
Measuring for a snug fit.
I have painted the styrofoam black and placed it in the lid of an old Athearn box. This will help me contain the coal that gets poured over top with some watery glue.
The coal load.
Looking good. I created a separate blog entry on the building of this car back in January, 2022. You can find it by referencing the blog archive in the right hand column at the top of the blog or simply copy and paste this URL address into your computer's browser where you will find a much more detailed clinic on the building of this car kit.
The title of that entry is "What's Old is New Again".
https://craftsmanstructures.blogspot.com/2022/01/whats-old-is-new.html
Back to the main structure from Bar Mills.
Here is my trick when adding a roof. I don't mind extending the roof sections slightly beyond where they must go. This is beneficial in fact as a simple scissors cut will help to keep them aligned nicely. I will later paint the underside of the shingles so they don't appear white and unpainted.
Rafter tails have gone in.
Because Doug did not want the rafter tails to extend below the roof line I added one addition course of roofing material from scratch.
That'll do.
The completed kit. I later removed the lamps as I had forgotten our time period of 1912. Yes...electricity had been invented by then...but it would not have reached rural Eastern Ontario by that time so the lamps would go after this photo was taken.
As mentioned earlier, Doug ordered this "depot" from Bar Mills in O-scale although we will have it serve a different purpose for our plans.
It is a rather charming looking structure for sure!
With the roof along with chimney and venting in place, it is now time to get that structure glued down.
The wrap-around deck that came with the kit does not match our loading dock...so it will go and another will be built from scratch.
Note how the loading dock is "adrift at sea" so to speak.
That won't last for too long as I will marry the two together in short order.
But first, time to add the Sculptamold (CelluClay is another term) to the surrounding area.
The gondola fits up nicely tucked in beside the loading area.
My weights do their job!
An "overall" view of the proceedings at the moment.
Some figures will be required. These came from Rusty Rails.
Funnily enough, this lad had two left arms!
We'll have to change things up a bit...perhaps file down that thumb somewhat!
Here is the sign Doug printed on paper. I simply created the frame and adhered the paper sign to a thin wooden backboard.
A few more detail items appear.
The rudimentary scenery is in place on all four modules at this point in time. Still lots to be accomplished including painting all dirt road surfaces.
Now that's a good colour.
I'm dabbing with an old brush the FolkArt "Country Twill" colour onto all dirt surfaces.
A closer look at the brush.
The colour difference. The dirt road will be weathered as well.
Coming along.
Later scenery is added to the machine shop module and you can note the darker road surface on the main road and leading into the shop.
I have added some darker tones here as well. Note the cardboard mock-up for the coal bins.
Blue styrofoam will form most of the coal piles so as not to waste much valuable ore.
I've painted them black before I will glue the coal atop the pile which will take place later on in this blog entry.
I painted and weathered the wood and the strips of styrene which act as bracing for the coal bins.
Ensuring everything is square.
Drilling the holes for the nut and bolt castings.
The castings come "many to a sprue".
My drill bit goes right through. This allows me to bolt things in nicely from both sides. I will have to cut down the length of the nut and bolt castings in order for them both to fit.
The brace on the right is going in and I have to line up the one on the left.
A closer look.
I'm liking the appearance of things!
The main building now requires my attention. I have had to add a foundation which will hide the base on which the structure will be placed.
One wall section is done.
Masking tape assists as the glue sets.
Looking good under different lighting.
The coal bins have come together.
They match up nicely with the siding deckwork.
There's one of those coal loads still requiring work.
I add a few details momentarily to offer me the "look" of how things are developing. No worries about the base for the structure being off kilter. All of the base will be covered with boardwalk which I will build from scratch.
The team of horses in their dappled grey mare appearance are eye-catching. It was fun building the horses and painting and weathering them.
The ore wagon has come a long way as well. It still requires some signage and weathering.
More foundation work has happened around the corner of the main office.
I am content with the placement of the coal bins and have now glued them down in place with my weights assisting.
Time to join the long loading dock with the platform I will build from scratch around the office.
Measure twice and cut once is my motto!
My metal ruler assists as a level.
The extension supports are now in place.
I am now able to build the surrounding platform.
Supporting legwork goes in.
Cross-bracing too!
I'm working my way around the main office. I pre-painted, stained and weathered the lumber before sections were glued in place.
Time to add stairs to bring the platform down to the next level lower down.
The finished deckwork located around the main office for the coal dealership. This shot was taken under incandescent lighting conditions.
With this photo taken under fluorescent lighting conditions.
Time to add "little people" to liven the scene. A paint jar and a large bin help hold the figures in their upright position while the glue beneath their shoes and boots sets. The glue appears an "off white" colour at the moment, but it will harden clear to invisible.
More figures go in place.
Aha! The coal is now in the bins. I used actual coal crushed down to scale for the job! The shovel offers a glimpse of scale here.
Remember the coal pile was blue styrofoam which I then painted black?
A glue/water mixture with a few drops of dish detergent will let the coal adhere to the pile.
The coal is in. The ground is weathered around the bins and a couple of gents are in a conversation. Neither are glued down at the moment, just leaning against the ore wagon and the center coal bin wall.
I'm getting a better view of the overall scene.
Doug ordered this crane from Model Tech Studios. This was a fun kit to build and I modified it quite heavily.
Note the change to the platform. The main crane's housing needed to be pushed further away from the siding spur as when the crane would swing (yes, I made it capable of turning) the housing would spread out over the track where it would crash into any car residing there or impede an incoming car's movement to the end of the spur.
Problems are opportunities for solutions. I had to add a short extension to the side of the dock. This meant pushing the bins further to the front of the module was required...this after I had already glued everything in place a few days earlier! D'uh!
I was able to carefully lift the coal piles and the coal bins without damaging them and shuffle them out to the far edge of the module and then re-glue everything in place.
Note how the bins now reach the very front of the module. This allows the crane to pivot easily and not touch the gondola residing on the spur.
These changes took up a full day of modelling just to make the new amendments but they had to be done.
See how the crane is able to pivot. I now have the bucket placed over top the ore cart.
And...over top the deck...but it is not able to swivel over top the gondola as it is not a working crane where I can lift the bucket higher.
Doug and I predetermined the height of the bucket we felt looked best and settled with the height you see here.
The scene is certainly coming alive.
I modified the clamshell bucket somewhat.
In order to have it actually appear to be a working bucket Doug and I chose to add a second cable which would allow the jaws to open and close - in appearances only. The coal in the bucket looks quite convincing!
Time to create a bumper for the end of the siding. Ignore my coal weathered fingers and thumb!
The bumper is in place.
Going back a step...here is how the crane travelled too far into the "spur siding airspace".
Lined up this way also brought the crane too close for comfort to the siding.
Therefore, a small extension off the side of the long loading dock was presribed.
Here it is resting in place as the glue sets.
I won't go into too much detail on the myriad steps in building the crane. Instead, I will create a separate blog entry sometime in the near future which will showcase the build. Here you see the boom under construction.
An image from the instructions.
A potential colour scheme is offered by Model Tech Studios. The crane can be ordered in O-HO-N scales. Kudos to this manufacturing company offering it up in a number of scales.
I have painted and weathered the base and drilled a hole (not quite centered but not really noticeable in person...only in this close-up photo) which will accommodate the pivot spool I will build.
In order to have the spool extend and be as solid as possible, I had to drill quite deep up through the main tower structure which was quite awkward as the tower was not a solid piece of resin...the interior was honey-combed. Lots of "filling" material was used to make this puppy sturdy!
Doug ordered this little motor that would typically be used to power the crane. I painted it the sage green colours.
I created a belt for the motor and cut an opening for the belt to head into the cabin. Note too the grey pulley attached to the cabin wall.
My belt makes its way to a pulley which will be hidden in the cabin. The belt will be pulled taut.
The seat and controls go in place.
Further pulleys begin taking their place at the far end of the boom. The loose cable will eventually be pulled taut as well.
The pulley holding the chain makes an appearance along with the other gears on the far side of the boom. There is a small amount of flexibility as per the boom angle. This will be the angle I will go with.
I installed an eyelet for the cable to the bucket to offer the illusion that the bucket can be opened and closed. Again...I will create a separate blog posting on the construction of the crane in the near future.
A back porch goes in on the office and note how I have blackened the roof somewhat at this juncture.
The gondola offers a view of the scene with some activity taking place.
Some more details take their place.
The dolly and the large trunk add to the scene.
Time to scratchbuild a fence and glue it in place. The weights work with the masking tape to help keep the fence upright while the glue sets.
That's better!
Some fall foliage and miscellaneous junk find their way onto the property.
A view from above.
Moe's drone view!
Yes, the ore cart takes some weathering as it has been dirtied up with coal dust.
Another aerial view from the other side of the tracks.
Looking good overall!
A glance down the tracks.
Foliage on this side of the fence saddles up to the ballast.
Another three-quarter view.
Here are but a few of the myriad steps in creating the ore wagon.
This is a Berkshire Valley Models kit.
Coming along.
The seat is in place.
The reason I am building another identical ore cart is because Doug and I want one to be "under repair" on the other side of the facility.
One clean...one dirty!
With the Walsh Coal & Drayage sign in place, the cart is ready to head to the repair area to have its front right wheel investigated.
Black powders offer up the coal dust for us.
At the repair area, the hoist works perfectly.
I'm liking this scene.
Yup...coming along nicely.
From another angle.
And yet another. Note how I have blackened the entire parking area and entranceway as per Doug's request.
Doug also asked me to blacken the entire roof.
Darkening takes place at the repair area at the very edge of the module.
Now, that's looking great!
Thanks for checking in on this fascinating scratch build of the fourth module representing the town of Tyrone at the turn of the last Century.
Check back in to see the build of the Model Tech Studios crane in a few days or so.
Here I am (slightly blurred) about ten years ago at John Mitchell's amazing NYCentral/Canada Southern layout.
All the best, Mike Hamer, Ottawa, Ontario, Canada