Enhancing Craftsman Structures
This Saturday morning I offered a clinic to the St. Lawrence Division of the NMRA on ideas and techniques to enhance craftsman structures.
This posting will showcase the images I used and the captions indicate my "talking points".
To enlarge the images simply click on them. To return to the default look of the page, click outside the image.
Because there is quite a lot to say in the captions, I would suggest enlarging each image first...read what is on the page...and then click outside the image to return to the default look where you can then read the caption.

I was called in to "pinch hit" for my good friend, Bill Crago, for this clinic. I spoke to the ideas and techniques involved in enhancing your kit...taking it up a notch, so to speak. I will also be delivering another workshop in October on how to prepare walls before construction of your kit. The image above showcases the Lumber Mill diorama I created a couple of years ago in HO scale. It offers an overview of my presentation. Along with the kit came that wonderful old flatbed truck from Sylvan Models. Clare, at Sylvan offers you the choice of having the wheels stay straight or having them turned. Because so many other vehicles on the market have only straight wheels, it begs the modeler to turn them! Also, if you have purchased a craftsman kit and do nothing more than build it to the specs in the instructions, you will have an exemplary model that will look fantastic on your shelf, your diorama or your layout! When it is done, I recommend planting it in a scene and giving it a story! This will help bring your structure to life!

Craftsman kits of today often offer great template drawings where you can do your modelling directly atop the page. To gain that weathered barnyard look for saw shed I ran a quick wash of my grey Hunterline Weathering Mix atop all wood sections before constructing the shed. I've owned these two mixes for over twenty years and they still offer great satisfaction when it comes to weathering wood. There are so many other colours available from Hunterline in this item line. Note the signage inside the shed. Signs come with most kits but I often go to the internet and find period signs I like and then save them to a Word document where I can resize them to my heart's content before printing them out in colour.

For the corrugated roof of the lumber storage shed I first painted the corrugated sections a light grey. After the paint dried I brushed on a few colours from my PanPastel collection to achieve the look I wanted. You can purchase these PanPastels from Gilbert Lacroix at GLX Models or at Deserres Art Store in St. Laurent Mall.

The small office offers "tab and slot" assembly. Because the building is very small, no additional bracing was required. I did add some bracing later just because I always do! Note the "peel and stick" doors. Your friends will consider you a master painter as you typically paint the individual components first then peel and stick them together. Yes, your friends will think that you are a Picasso or a Garfunkel (thanks to the band The BareNaked Ladies for that one). I told the participants in the clinic that I feel you will resemble Robert Bateman as the finished product will look so realistic.

I dedicated my full presentation to a great friend of all of ours in the hobby, Bill Crago. He was going to offer this introductory clinic on scratchbuilding, something he is a master at doing! Many ideas we can learn from Bill while scratchbuilding will easily be applied to craftsman kit modelling. Bill has proven himself adept at working in multiple media as one of the ideas above implies. As for me, I hadn't worked in styrene as I was fearful of the process. It was only after I attended a clinic by fellow SLD modeler, David Primeau, with the theme of working in styrene that I felt comfortable to try my hand at it. "Why hadn't I worked in styrene before?" I thought to myself. David showed me how easy it was. I also had a resin kit of a marine vessel, a sardine hauler, on my shelf for the better part of a decade. I never brought that kit down from the shelf as I was too afraid of building a ship in resin. It was only after I completed the build of a Canadian Northern 3rd Class Railroad Station in resin for my friend, Chris Lyon, did I realize that if I can build a structure out of this material, then I can build the ship using the same process. So, don't waste all of those years being fearful of working in different mediums like I did. Get started and you'll realize that you can do it! Hey Bill, I love how you personalized your structure naming it after a good friend of ours, professional photographer and author, Ray Farand.

Bill shows us how he combines various structures into a single scene. He also names some of these establishments after beloved family members. The two smaller structures, the ice cream stand and the burger shop are named after his granddaughters! Bill helps to establish the purpose of a building with the use of signs he has created on his personal computer. A variety of after market purchases; the gas pumps, the Texaco sign and the various vehicles help to detail the overall scene. Light weathering of the white structure helps to "tone down" the whiteness.

Note how Bill has varied the roof pitches in the top image. You may not have the opportunity to do so on your structure, but you can always find a way to add a small shed attached to your structure or a canopy awning like the one in the top image with the corrugated roofing. Or, you can vary your roofing materials within the confines of the same structure which Bill has done so magnificently. Add a full or partial interior and light the scene for visitors to admire your work both inside and out!

Of course, we all remember this great display case Bill has been bringing out to the train shows over the years. Bill would know the make, model and year of each of these automobiles. I think I've drooled a puddle on the floor every time I've examined this magnificent showcase! We're thinking of you, Bill!

Here is one of my first craftsman structures that I built and placed on my model railroad which I named after my good friend, Stan Conley. The kit came with the office, the lumber shed and a smaller shed. To enhance the structure I chose not to build the smaller shed. Instead I scratchbuilt a coal bunker based on plans from a 1950's Model Railroader Magazine that my good friend Trevor Marshall had sent me. Having both lumber and coal share the same spur makes for greater interest in train operations.

The kit was a John Rendall kit. Yes, craftsman kits cost more than regular "shake the box" kits, but you do get your money's worth. They will take longer to build so enjoy the process and don't rush things.

While my model was built shortly after I got into the hobby, Bill Irwin has built the same structure in N-scale. Look at the roofing on his wonderful model...much nicer than mine. This is because he was not afraid to "drift" from the materials that came within the kit. Looking good, Bill! My version will remain "as is" as it is sentimental to me from my earliest moments of modeling!

A little bit of kit history. I feel it important to honour the Atlas Tool Company for bringing out these ubiquitous kits that we all remember building when we first got into the hobby.

Chris Lyon had once offered a clinic on taking a very inexpensive plastic kit and transforming it into a kit that rivals the craftsman category with the use of clever painting and weathering techniques. Look closely at the Atlas telephone poles.

I still purchase these poles today. I spray the entire pole silver then I cut off the insulators for use in my scratchbuilt poles which I use on my layout. Instead of plastic I use basswood for the pole and cross arms and styrene for the "V" supports. I then glue the sacrificial insulators atop my cross arms. I also make use of the telephone box (seen in the photo) and the transformers on other examples not shown in this image on my railroad.

In fact, the Atlas Models Signal Tower "held its own" for more than a decade on my HO Scale layout guarding the junction at Lowell outside of Boston. It was only when I found the American Model Builders version of a B&M interlocking tower which I painted in B&M colours, did the Atlas tower find a new home on a shelf outside the layout room.

In 1960, the "mom and pop" business known as Campbell Scale Models come into existence. You all must have one of these red and black checked boxes on your shelf somewhere!

Their kits include fantastic template drawings to scale where you model directly atop the sheet as we shared earlier. In image three, I attained the wall colours I desired by running a "wash" of pastels and chalks in varying tones of red and brown. After this dried, I ran another "wash" of black acrylic paint with lots of water to "pop" the lines in the wall. Figure 4 shows how I've integrated the scene by adding a number of maritime detail parts such as the life preserver, a boat propeller and a series of lobster pots to go along with the small marine vessels in the scene.

We must thank this "great" of the hobby, George Sellios for starting up Fine Scale Miniatures. My young family and I received a personal visit with one other individual many years ago. George was most humble even though I was in awe of his railroad. I felt blessed to have had this visit on an "off" weekend from his regular "once a month" hosting where a couple of hundred visitors visit his layout. George also gave me advice not to "super detail" every aspect of my railroad like he had done. "Give your visitors' eyes a little break every now and then!" he suggested.

Today there are numerous companies that offer great kit offerings. Art Fahie at Bar Mills and Doug Foscale at FOS Scale Limited are but two of the greats in the hobby. In image 2 I married my two main hobbies together, my love of modelling with my passion for music. I call that diorama "Milepost 27" due to the fact that there is an infamous club called "Club 27" in the music world. Google it and you will find over 100 musicians who died at the age of 27. Jimi Hendrix, Janis Joplin, Jim Morrison of The Doors, Brian Jones of The Rolling Stones and Amy Winehouse of recent years to name a few. On my diorama there is a guitar player with his guitar case on the platform about to board the next train at Milepost 27. It is my sincere hope that he travels aboard that train to Milepost 28, mileposts 29, 30 40, 70,80 and so on. May he live a long and healthy life making music and, hopefully, making great railroad related models! Yes, marrying your major hobbies together can prove quite worthwhile! In image 4 I had my friend, Kaz, create some lovely signs for my version of that backdrop building honouring my good friend, Jim McSherry. I also used a "two-toned" approach when it came to painting the structure just like the images on the box...only with different colours and different window and door colour choices. Foscale offers these truncated backdrop kits which have proven very helpful for modellers in small spaces where perhaps a shelf layout is all that they have room for!

I trawled the internet in search of modellers' views on craftsman kits. The definition at the top of the page is a standard dictionary definition of a craftsman. The images on this page are all N-scale craftsman kits that we used on the N-Scale coffee table that was built for Railfair/CHEO in my basement by a half dozen modelers. Ron Newby and Rob Kazakoff donated these great structures for the project. Thanks Ron and Kaz!

The three models shown by Stan, Grant and Bob illustrate how a model can be placed on a diorama. Stan's "Tweed News" was part of a group build at SLD in 2008-09 where we all gathered as modelers and forty of us turned our version of the same kit into something completely different. The kit was the Banta Model Works Silver Plume Bakery with the single caveat being that none of us would build it as a bakery! Too much fun! We love Grant's lovely woodworking involved in the creation of his diorama base with the lovely depot trackside. Likewise, Bob's scene is replete with many amazing detail parts held to a theme which astounds the viewer.
I love the two written definitions above regarding how the building of a craftsman kit is just like attending a university course on the subject. With each kit you accomplish, you build on your reservoir of skills. I also love the "ditty" regarding the amount of profanity involved when craftsman kit building along with the "vanishing" parts into the "4th dimension".

The image above of Bill's layout showcases how he took two craftsman farmhouse kits and combined them into a lovely "rural estate". Ron did a spectacular job on what appears to be a plaster kit. Love the stonework, Ron. Dave created a beautiful round barn based on a prototype located in New England. I am not sure if this was a kit or a scratch build. Regardless, it's a beauty, Dave!
Note the argument as to who must take the credit for the outstanding appearance of the models...is it the person who produces the kits or is it the model builder...or both?

Well, I have built the Sierra West Machines in O-scale and I would disagree with Brett. I would say that 99% of the credit would go to his amazing models and their castings and I would take 1% of the credit for the finished model!
We truly appreciate the efforts of Bob with the Foscale model he completed, Lorne with that amazing looking structure and Chris with the South River Model Works kit he must have spent tons of hours creating!

Greg has done a great job on the American Model Builders farmhouse kit which looks "right at home" on his layout. James did a masterful job on the church residing atop the rocky outcrop and Bill Irwin has brought this Bar Mills kit together beautifully!

Check out the lovely depot, freight shed and smaller shed located in the urban region of my layout that my good friend, Dave Haney, gave me. These are painted in Boston & Maine colours and are scratch built from styrene. Ignore those for now. When Tony Koester (who writes the Trains of Thought column in Model Railroader Magazine) visited my layout, he immediately pointed to a building in the image above and asked, "Mike...who produces that kit?"

This was the structure he was pointing at. It is the "Queen Anne Storefront" put out by SLM models. It was at that point that I realized the importance of creating craftsman kits!

As we study some more of Bill Crago's fine handiwork in very interesting colours, a smile comes to our face. For when Bill is smiling...then we are too!

So-o-o...I created this "Wordle" in the similar colours Bill had used on those Burlesque kits. The "Wordle" includes names and words related to craftsman kits.

Let's examine the many ideas and suggestions you may wish to follow in your pursuit of building a craftsman model.
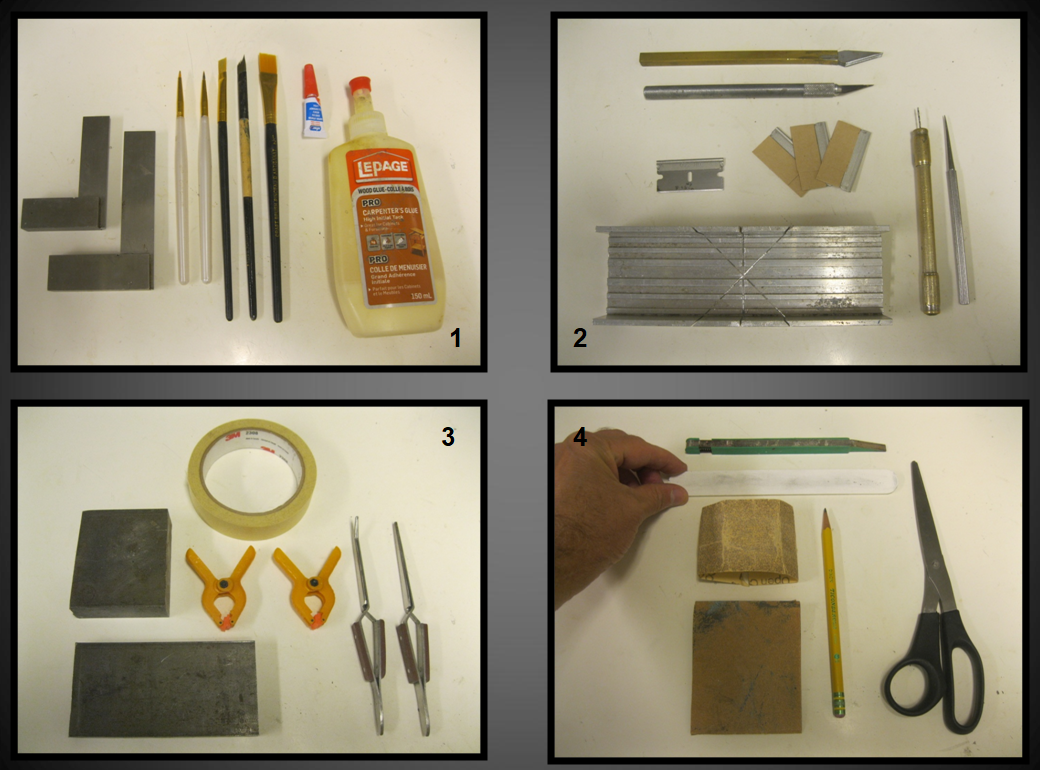
Have all the necessary tools ready to take on the job! Image 1 shows the squares for ensuring your adjoining walls are "square". You can also us clamps for this job. Paint brushes of many styles and sizes are used for "washes" of paints, stains or powders as well as brushing powders onto your model in a dry fashion. The brushes can also be used for gluing in difficult locations. A variety of glues will come in handy as well...carpenter's glues and ACC which I purchase at the Dollar Store in a container of five. You may prefer other glue choices. Image 2 shows the miter box for cutting wood on angles. I always start a new project with a new razor blade and a new X-acto blade. The pin vice allows me to create starter holes when I want to cut out a window opening on scribed siding. Image 3 shows the weights I use to place atop the walls once I've glued the bracing. Let these sections cure overnight. Clamps and self-locking tweezers come in handy for a variety of purposes. The masking tape I use on the reverse side of a wooden section of a wall when I want to carve out a window or door opening. It will help to prevent slippage beyond the point I wish to cut. Image 4 shows sanding devices. The pencil is for marking cuts and the scissors I use to cut out posters and signs I have printed from my computer.

Here's my favourite tool of the bunch. I call it the "Monster Scribing Tool". I "draw" it along some clapboard siding or wooden wall timbers and planking. It works in any scale and, once I have stained and weathered the wood, the resulting "look" is exactly what I have aimed for!

The "Monster Scribing Tool" came in handy with my floor planks, rafter beams and supports in my scratch built machine shop.

These are the machines I created in O-scale. The castings are amazing and I thank Brett Gallant at Sierra West Scale Models for producing these kits. The machine shop structure itself has been completely scratchbuilt and this is still very much a project "in process".

Have all your paints and stains ready to go. The Saman Furniture stains are available at Rona. The Hunterline Weathering Mixes can be ordered on-line or at your local train show if the company is invited there. The acrylic paints are available at Michael's. I rarely paint "pure". I typically apply "washes" with little paint and lots of water on my brush!

Have all of your necessary weathering materials at the ready.

All of the powders and pastels can be applied to your model in light brush strokes with a make-up brush or they can be applied with a wash. The watercolour pencils work well when weathering a specific area or small detail items.

A great suggestion when taking on a new kit build is to research on-line how other modelers built the structure.

By doing so, you gain a number of ideas that you may utilize in your build and, perhaps, some ideas you might omit.

For my model of the this Bar Mills kit, the Shipyard Brewing Company, I selected the same colour choice as on the container cover! Very creative of me! After I had built the kit, I determined that the loading area was not large enough to support a siding spur.

I chose to effectively double the size of the structure. I had to remember my painting and weathering techniques as I built the addition many months after the original build!
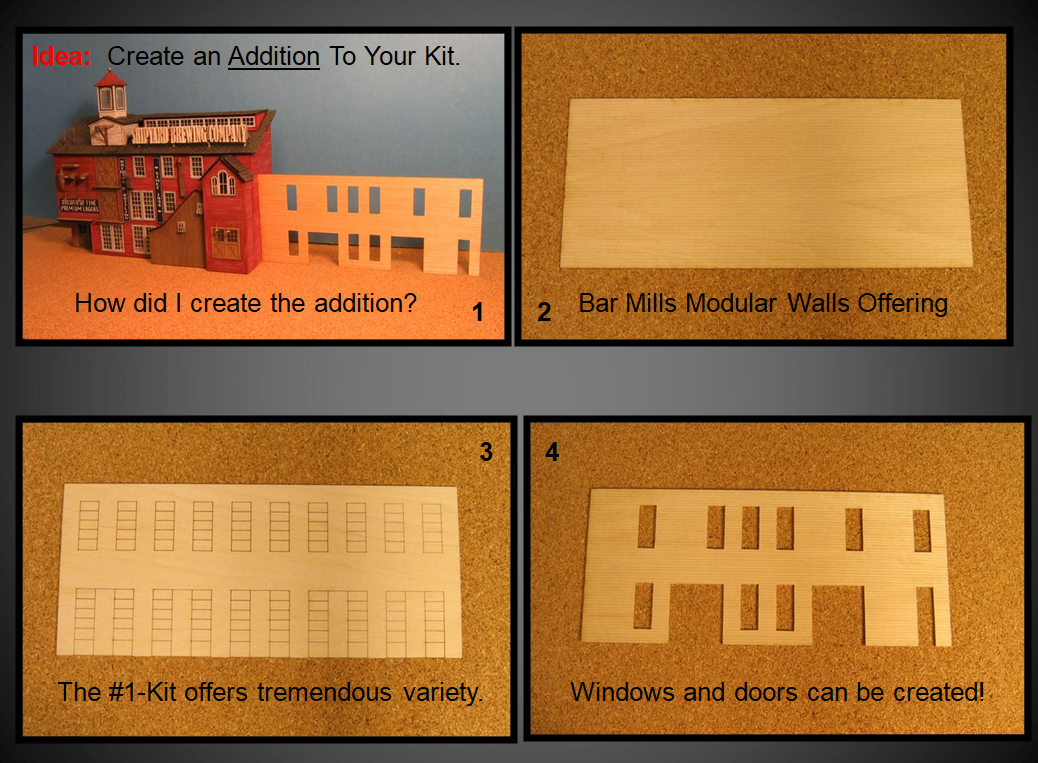
Just like those DPM modular brick wall sections, Bar Mills offers a modular wooden wall choice called the #1-Kit. It even has scribed areas on the interior wall that offer up a wide variety of window and door placements and sizes.

Trim is available in the kit. I went to town scratchbuilding the framing to support my addition. I recommend basswood and not balsa for the job. It is stronger. I also copied and applied some of the signs on the addition for continuity. Finally, I scratchbuilt a loading dock which could support two rail cars!

For my "Berrigan Boatworks" diorama, I did much the same. The original structure along the back wall was a Foscale kit called the "The Winger Paper Bag Company". I felt it needed an extension. I wanted to marry this building with the Full Steam Ahead R.G. Shinnie Boatworks structure in the foreground. For continuity, I painted the buildings in the same colour tones to make it appear that they make up a single larger facility. For the windows on the addition, I wanted them to look like the large window on the upper front on the main building, but none were available on-line...so-o-o...I robbed Peter to pay Paul. I took the two windows from the back of the front building and then boarded up the area just in case anyone peered around the back of the structure!

My friend, Doug Matheson, needed two interlocking towers for his HO scale layout and I told him that I would build them for him. To make them "fraternal twins" (I am a fraternal twin!) I changed up the end walls in the second tower by swapping them around. Note the difference in the end walls. I also added a different chimney to the second tower for added variance in appearance. To create the crease lines when the plywood crib is taken away from the concrete structure, I gave a horizontal wash of a light grey colour to the white walls. I also weathered the terra cotta roof with Pan Pastels.

The interlocking tower which protects my junction of the Maine Central and Boston and Maine railroads is a plaster craftsman kit. I built this structure a long time ago when my daughters were still in grade school. I noticed one of my daughters doing her homework colouring a work of art she had created while I was sitting at the kitchen table looking over the contents of the tower kit. Typically with a brick building you would paint the walls the brick colour of choice first (red in this instance) and then run a "wash" of the mortar colour to create your mortar lines. If you read my information in the image above you will see how I did the reverse. I painted the full wall the concrete colour then ran "ever so lightly" my daughter's red felt tipped marker. By not pressing hard, the red remained on the brick's surface and did not run into the crevices where the mortar is.

As I mentioned earlier, I attended an SLD clinic a number of years ago offered by Dave Primeau. He showed us the ease of working with styrene. I was most impressed with his techniques so I decided to create the enclosed stairwell on the large wall of the Phillips Furniture Factory out of styrene. I then painted the walls brown and weathered with a "wash" of black acrylic paint. These techniques helped to give the styrene a realistic wooden appearance. I made the large sign in pre-internet days where I actually painted the brick walls black for the background and then burnished on the letters individually trying to keep them all straight! Note the boarded up windows in the factory...a nice little touch that adds character!
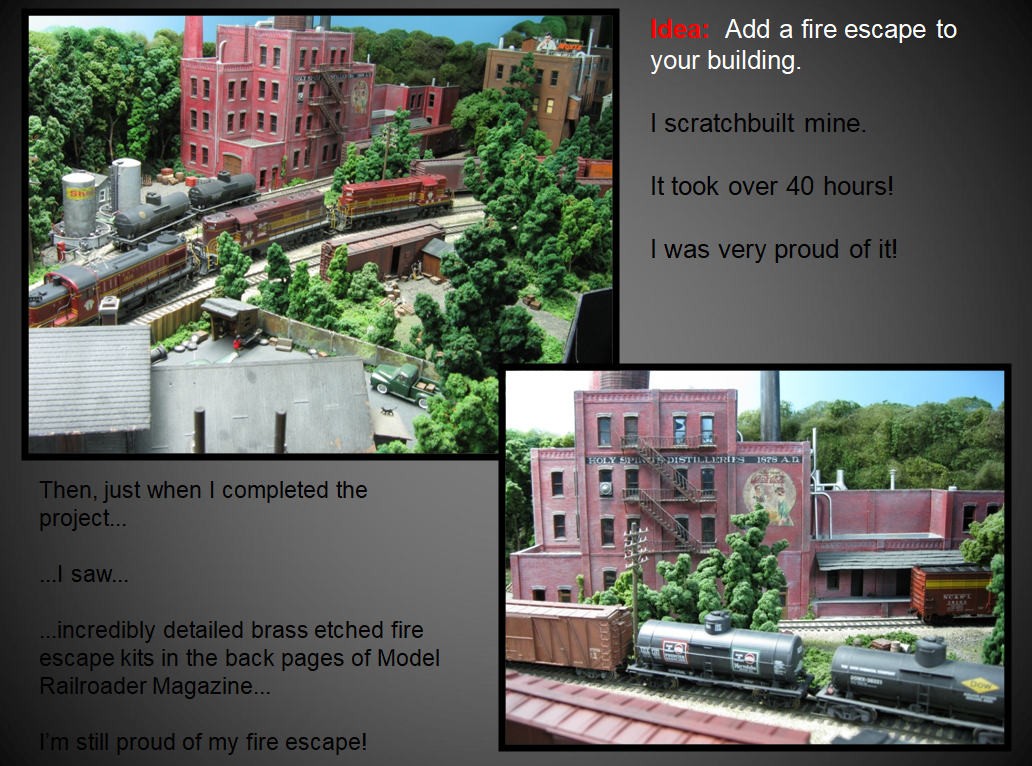
Man, that fire escape was something else, for sure. I named the facility the "Holy Spirits Distillery" as a "play on words" seeing as I am a Catholic school teacher! Big smile!

Combining elements from two kits can allow you to create a larger structure with more character. I built the Barrel Factory and I won the canopy as a door prize at SLD at the end of a meeting. I believe Dave Primeau had donated it. Thank you, Dave! The canopy came as part of the structure you see on my diorama in the bottom image. Apparently Dave did not need the canopy over the dock.

Once the larger structure came together, I chose to "angle" it on the diorama for greater visual interest. I also felt the scene needed another structure to balance things out so the "Hubcap Haven" kit from Bar Mills fit the bill nicely.

While some of my dioramas have their stuctures residing on flat land, others I have made do not. I find that changes in elevation add greater visual interest to the scene. This project has the buildings jutting out over a ravine. I scratchbuilt the smaller shed out back to balance out the scene.

Yes, another great way to enhance your craftsman structure is to scratchbuild appendages and in this case I required supports for the structure that fanned out over the ravine along with an elevated walkway. These were all built out of bass stripwood, painted brown and weathered with a wash of black acrylic paints.

Here's where I added the scratchbuilt shed out back of the tractor repair shop and re-used the stencil sign as part of that project.

Yes, a Hoosegow is a small prison. I was asked to build this structure and place it on a diorama for the kit manufacturer, Walt at Rusty Stumps. Being a prison, I decided to place it on an island similar to the Alcatraz scenario! That man in pinstripes is wearing his prison garb as are the horses who have done something wrong! Oh oh...it would appear the sheep are their followers...what sort of mischief will they get into!

Cardboard is an inexpensive way of "measuring twice and cutting once" when it comes to mocking up appendages for your craftman structures!

When lighting the interior of your structures, be careful to seal off any little gaps where light can escape. You do this before you glue the structure to the base of the scene. This scene occupies quite a small diorama.

This is the legion hall on my layout which I built from scratch in my earliest years in the hobby. It has worked the land reasonably well as it juts out over the Salmon River which separates the states of New Hampshire and Maine on my model railroad. Again, this showcases my earliest of modeling skills so the building is very sentimental to me!

Hey, check out Stan's and Gilbert's amazing models from an SLD project many moons ago! Note how Gilbert reversed the front elevation of the structure. Clever that is!

Some great examples where items can be sacrificial lambs and make a huge difference when they have a new role to play!

While I do love building craftsman kits, I experience great joy in placing them in a scene and giving them a story. This helps to bring the modeling alive for me! Not only do I name the stuctures...either with the name that came with the kit or one I make up on my own...I also like to name their diorama scenes.

Some clever use of discarded material. There is even an example of recycling an already recycled item! The front section of the building has no interior so I didn't want to waste the nice decking that would be hidden below it so I cut out the decking and replaced it with a flat board...saving me more decking material to use on another project!

Three dimension signs capture the attention of the viewer if used sparingly.
Mrs. Hamer offered up the idea of using Orzo (a form of short cut pasta) for the fish in this maritime scene. (Yes, I know...I should paint some eyes on the fish!) As for putting the fish on salt, I wondered and wondered for days what I could use to emulate salt in HO scale. Then it came to me in the middle of the night...use real salt! It worked! I initially thought that as soon as I wet the salt and added a touch of glue to the mixture, the salt would dissolve...but it didn't! It has remained that way for many years now! With the fish salted they can be sent inside the building.

Here's where those self-locking tweezers came in handy. They worked as if I had two buddies assisting me at my workbench for tying off the bumper tires!

I will be delivering another clinic next month.

In that clinic I will be dealing with preparing your walls before kit construction.

I will share the many materials I use to create these realistic wall colours emulating wood.

I will take you through my journey in creating a farmhouse similar to the one Greg Stubbings had made with the one caveat being...I wanted it angled to the backdrop. This meant some truncating had to be done. Of course, the structure couldn't be cut after it was built. Once again, a cardboard mock-up came in real handy!

We worked on this Railfair/CHEO project in John and Debbie's basement room over a period of weeks.

I will also share with you the steps involved in taking a rectangular kit and converting it into an L-shaped structure using only the wall and roof sections available in the kit. I honour my parents with this project entitled "Hamer's Haven". Our home was fondly referred to this way by all of my siblings' friends as they all loved my parents who were much older than theirs. My twin brother and I were born when my mom was 39 and a half! Yikes!

This is our dream...to be able to gather once again as a group in the church for our regular SLD meets. Thank you for checking in on my clinic!
All the best, Mike Hamer, Ottawa, Ontario, Canada