Mike's Canada-Wide NMRA Clinic
On May 17th I delivered a clinic on incorporating scratch building with craftsman kit construction.
I shared ideas across four scales, N, HO, O & G.
I've made every effort to offer information in the captions which I spoke to during the clinic.

My title page showcases an inbound B&M manifest freight train taking the crossing at Boundary Road on my Boston and Maine/Maine Central model railroad.
(Remember, you can click on any image to enlarge it and click outside the image to return to the default look of the page.)

The same train, Train PM2, "The Newsboy" is seen exiting Marshall Cut at Milepost 39 in a previous decade with an earlier generation diesel locomotive grouping.

Here are some examples of modelling involving both scratch building and craftsman kit building across the four scales.

I dedicate the evening's presentation to all of our friends from the Ukraine or of Ukrainian heritage. I have two friends who hail from this beautiful country.

The N-scale focus is on a synergetic project a dozen modelers in Ottawa built for the annual Railfair train show where ticket proceeds from the raffle of the layout went to the local hospital, CHEO, the Children's Hospital of Eastern Ontario.

It was great fun to have a dozen modelers descend upon my basement crew lounge for a few months of "once a week" work sessions on this wonderful N-scale project. Each week they took home "homework" with them and returned with amazing modeled efforts!

For the HO focus, I will examine examples of scratchbuilding and craftsman kit construction on my layout and from the many dioramas I have built since my layout was completed in one calendar year in 1997!

I will share with you my latest project for my friend, Professor David Gardner. The four structures from the Builders In Scale "Tidewater Wharf" kit took me a month of evenings to construct and only a day to build the diorama. Because the buildings will be going onto David's layout, I was careful to not have the water lap up to the boat ramp for ease of removal. The diorama will be discarded when David receives the four structures.

My O-scale focus is on this machine shop build I have been working on for another good friend, Doug Matheson. Doug had worked in a machine shop to help pay his way through college. He started two of the machines but was unable to complete the rest. That's when he asked me to take over, which I did.

The simple act of modelling the machines morphed into the scratch building of a machine shop to house them...which turned into a diorama for the shop...which ultimately turned into a town for the facility.

I will follow up the end of my presentation with a look at some kit built and scratch built structures on the large scale model railroad on which I operate each Saturday morning here in Ottawa belonging to Fred Mills and friends. It takes twenty operators to bring the two railroads to life!

Tools and materials that you use to build kits are the same ones you use for scratchbuilding.

I would like to point out the squares in image 1. They are a definite "must have" in your arsenal for keeping items squared. I always start with new blades for each new project. The heavy weights are handy for keeping larger items stable as the glue sets. Clamps and self-locking tweezers are required for those jobs where items must remain attached over longer periods of time or when more than one person's set of hands is required to get the job done.

This scribing tool gifted to me by Ron Newby is fabulous for scribing grain in wood before painting and staining. You have to be careful to use just the right amount of pressure!

Working in a variety of scales finds this Model Railroad Reference Rule a handy item to have in the toolkit as well.

My trusty squares in action!

Excellent for framing up structures of all kinds!

Paints and stains which I like to use in my modeling.

Weathering materials.

A closer examination.

These SAMAN stains provide that "rustic" look on structures.
They are available at RONA stores in Canada.

I like the Hunterline Weathering Mixes as well.
Note my reference board with the furniture stains offering a "one coat" look and a "two coat" look.

The SAMAN chart.

The choices in my arsenal.

These shacks come from Full Steam Ahead's Black Cove Harbour.

I've used the stains exclusively on them.

They offer up a realistic appearance.

A bit of black acrylic paint used here on the rolled roofing.

Yes, you can stain the shingles as well as the walls.
Effective use of the chocolate tone to get that darker appearance.

Fluorescent lighting is used in the upper left image.
Incandescent lighting is used in the lower right image.

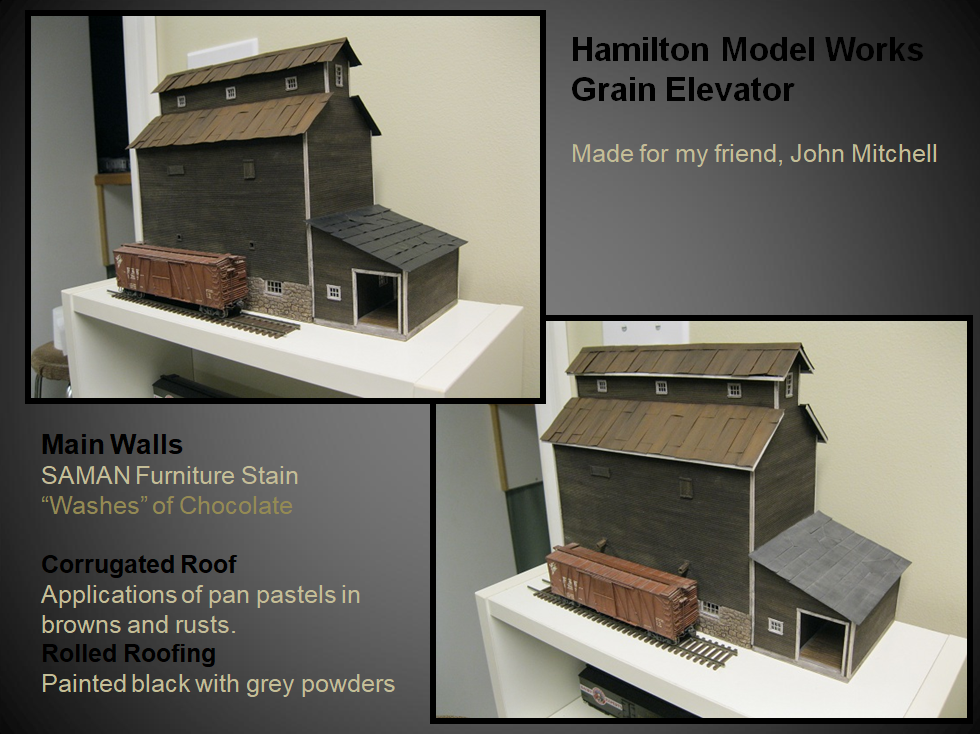
John and I only had the box cover to go by. We had to "guess" as to the colour of the grain elevator from Hamilton Model Works.

I made use of the Hunterline Weathering Mixes for much of the wooden structures in this build.

Craftsman structures often come with templates drawn to scale allowing the modeler to work atop the paper.

The lumber storage area was coloured with the light grey mixture of Hunterline mixes.

When using acrylics, washes of single layers at a time will allow you achieve the right amount of colouring you desire. The blue structure was painted this way. The mahogany tones in the building in the lower photo was established with an acrylic wash of maroon followed by a wash using rust coloured Pan Pastels. Then, a final wash of black acrylic helped to "pop" the details in the walls.

Let's start off with a look at scratchbuilding and craftsman kit construction in N-scale.

Here we catch four lads photographing the finished version of the coffee table we made to raffle off at Ottawa's Railfair, the annual train show held in the nation's capital. As mentioned earlier, the proceeds of the ticket sales went to CHEO, our local children's hospital. Ron Newby, in the orange shirt was changing from N-scale to a larger scale and donated many craftsman structure kits to the project. Thank you so much, Ron, for your extreme kindness.

A dozen fellows descended upon my home once a week to create this little gem of a railroad. Because we did not want an electrical cord running from the coffee table to an outlet in the winner's home for a little person to trip over, Stan Conley devised an ingenious rechargeable battery system which he located beneath the table allowing the two trains to run.

Since we wanted a water feature with elevation changes to the landscape, a bridge would have to be constructed. Jim McSherry volunteered to take on the task of building one from scratch. In order to determine the shape of the structure we first had to determine the shape of the track. In order for the trackwork to retain its perfect curve, it was taped down to the cork on the styrofoam. Jim was able to then trace the curvature before he headed home to "do his homework" in creating the bridge supports.

Jim created a jig to allow for conformity of the structure. He then created a subroadbed and the bridge took shape on his table poolside in his backyard.

Seeing as Jim models Vancouver Island railroading, he is experienced in trestle design for his own layout. His reference books show it all!

Jim, you get an A+ on your homework. The bridge underbody fit perfectly below the curved tracks when he brought his homework "back to school" at my place! Later we weathered the plastic track ties to match the brown of the timbers below.

We see Bill masking off the edge of the base before conducting the pour to ensure no water material falls to the carpeted floor. (Mrs. Hamer also put down some cardboard over top the carpet for added protection - just in case!) Big grin!

The trailer came built up and was weathered by Chris. Bill wanted the canoes to appear bright and shiny for the new rental season. They were placed up from the water nearby the yellow structure known as "Waterfront Willy's".

This is one of the man craftsman structures donated by Ron.

Rob Kazakov donated this trio of structures to the project. Thank you, Rob, for your act of kindness as well. Kaz and I enjoyed building them up. We placed them together as a package of tenements as they typically are seen around town.

Bill did an impressive job in creating the gas station structure. Note all of the added detail in and around the building. Chris ordered the wrecked cars for the scrapyard. I can't remember which company offered up this kit.

The wrecked vehicles came in a sheet of resin which Jim cut up for us on his saw. Chris then did a masterful job in painting and weathering the scrapped vehicles and then in planting them within the context of the scene.

Jim then went crazy on us. He suggested that we provide electricity to all of the houses and establishments. In N-scale, Jim? Yikes! We were happy that he volunteered for the job!
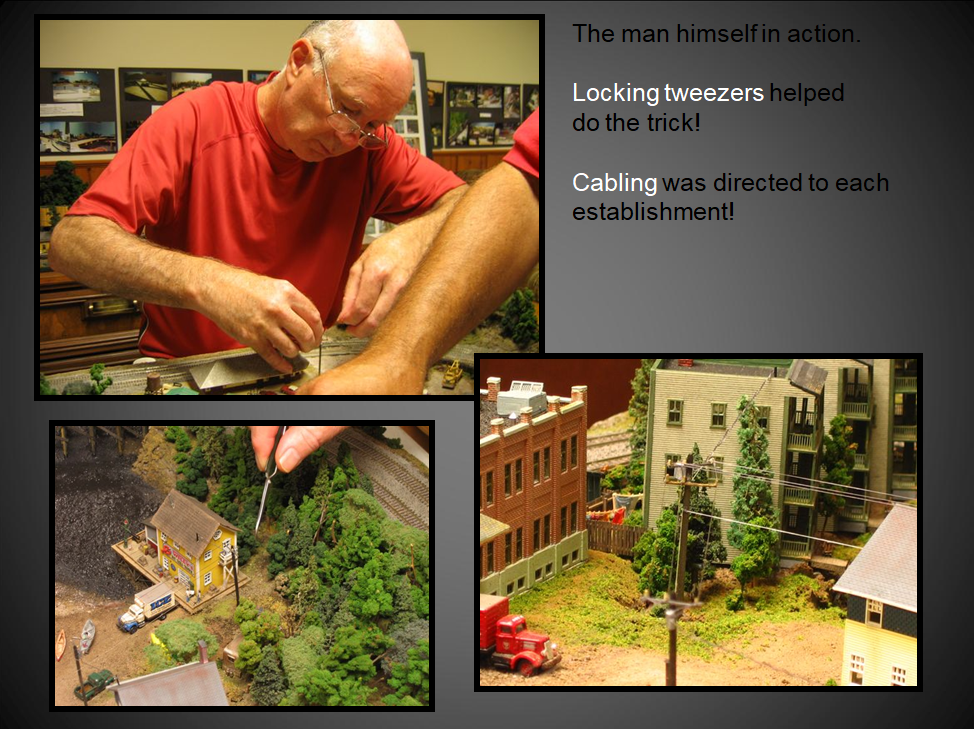
He went to town using those self-locking tweezers and along with the stretchy material for the power lines! Great job, Jim!

I enjoyed building the Bar Mills offering known as "Waterfront Willy's" so much that I went and ordered the kit in HO to build later! I then scratchbuilt the lower dock out in the water. Ron Newby found a charm from a charm bracelet of a fish skeleton so we changed the lobster out for the fish. Hmm...not too sure if you want to dine at Waterfront Willy's anymore!

Some more of the many structures donated by Ron.

Model railroading can be an endeavour you take on all by yourself (lone wolf) or it can be a great way to have fun with like-minded friends as this project demonstrates!

We worked like "worker bees" throughout the entire length of the project because we had a deadline. We managed our time successfully and completed the build in plenty of time.

My wife, Lisa, and I are cleaning the glass top between build sessions. The lower right image showcases the final product as set up at Railfair.

Let's examine this concept in HO scale. This is my Boston and Maine layout I built in 1997. I was relatively new to the hobby. I hadn't purchased many craftsman kits seeing as I was a rookie.

Yes, most of my structures came from the easy to build kits offered in the Walther's magazine which I could pick up from the local hobby shop including the standard DPM regulars such as the modular walls.

Excluding the station, freight house and small shed gifted to me by my friend, Dave Haney, there was one building which stood out from the rest.

Tony Koester from Model Railroader magazine pointed it out to me and asked me which kit it was. I knew then that craftsman kits took your layout up to another level...and I would soon learn...the quality of your modelling would improve as well.

The bridge which I had in mind for this scene required some big planning and then a whole lot of scratch building.

With the assistance of my good friend, Stan Conley, it came to life.

It helps to make one of the hallmark scenes on my railroad!

The legion hall was built from scratch after I saw a similar structure in a real (not modeled) picture in a magazine. I simply had to build it.

Yessirree...a fave scene in my books!

Some more scratch building came in handy as I did not want my bridge peers to look the ones I thought most everybody else had.
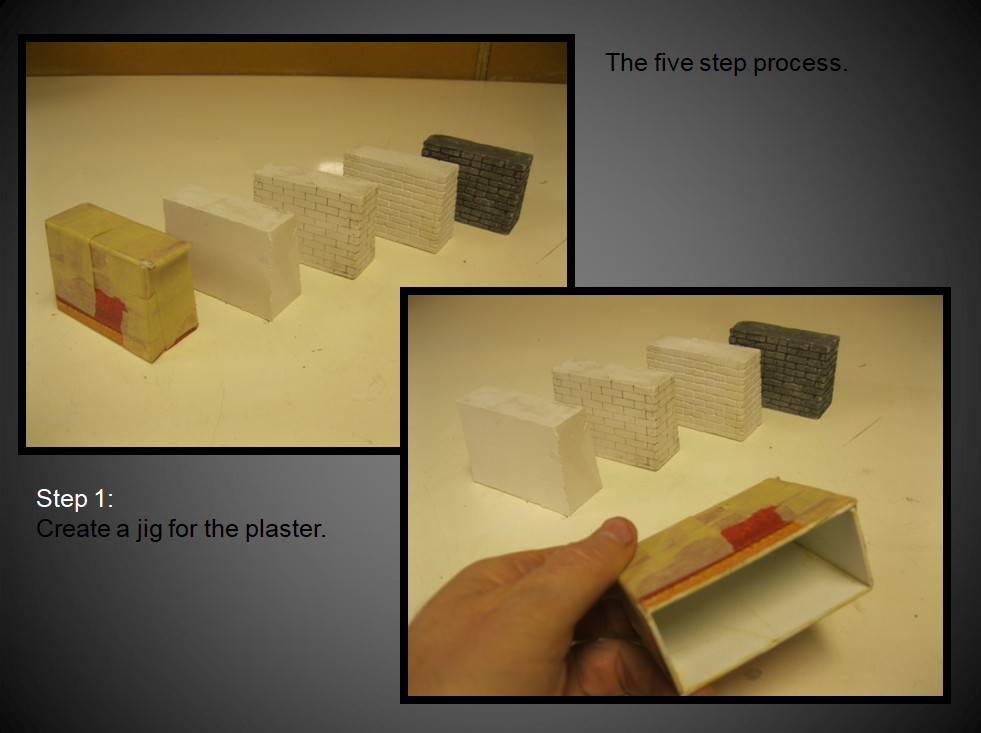
Similar to my stone arch bridge construction I built a jig.

I poured the plaster and let it harden a few days before creating the peers.

I followed the same process for the upper portion of the peers as well as the cap. (Other friends in town then asked me to build bridge peers for them!)

Another very special location on my layout.

What a thrill it was to have my model railroad grace the cover of Great Model Railroads 2004!

The telegraph poles were not totally scratched as I stole parts from the Atlas offering and created the pole, cross arms and supports from scratch.

I thank my daughters for helping me to come up with this novel idea of painting brick on this craftsman structure.

That old Atlas tower which I repainted stood proudly for a number of years before I purchased the American Model Builders tower which was a dead ringer for a B&M one!

Today you can simply print your own signs on your home computer. I had to paint the brick black and burnish on the white lettering very carefully in order for all of the words to line up properly.

Murphy's Law dictates that when something isn't offered by the model railroading industry and then you go and scratchbuild the item...as soon as you are done...rest assured...it will come out next month in the magazine press!

My very first ever craftsman kit...a John Rendall offering.
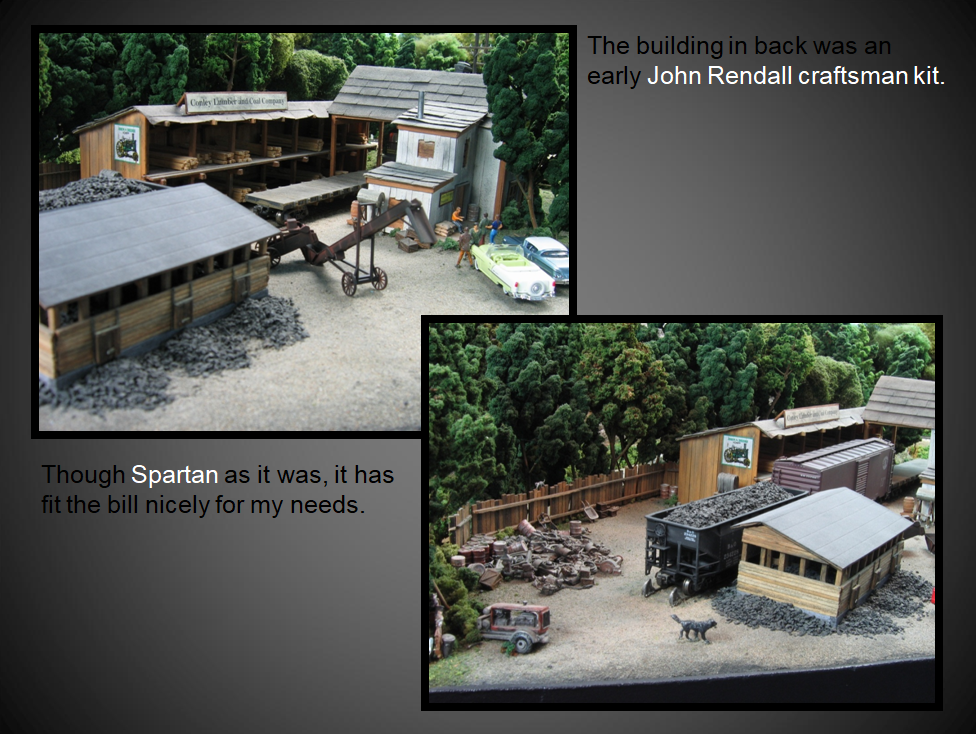
Though Spartan...it filled the bill for this location.

Thanks Trevor for the blueprints for the small coal shed.

Thanks Stan for the conveyor system!

Onto a few craftsman structure builds. Which colour to choose?

Making the structure railroad worthy.

Bar Mills "1-Kit" offering.

Seeing as I built the addition some six or so months after I finished the original structure, I had to remind myself of the painting and weathering techniques I had used in order to get a close match. If the match wasn't perfect, then that's okay too...seeing as the new section is...well...newer! Big smile!

Sometimes you may wish to draw a sketch before you create a scene.

Another example where an addition was added to the back building. The Berrigan Boatworks structure is a Foscale kit. I felt that in order to make it railroad worthy for a spur, an addition and longer loading dock was required. I also wanted the structure to match the building out front on the water and be part of the same facility...thus the matching colour tones.

Starting the diorama offers up a ton of scratchbuilding from the base to the placement of buildings and the creation of scenery joining them to each other.

The scene comes together when the landscape gets painted.

How I painted the backdrop with the sky and clouds.

Scratchbuilding to join two separate kits from the same manufacturer.

Balancing out the diorama and angling the scene to create a greater sense of creativity.

Modelling changes in elevation adds visual interest to a scene.

Modelling in what I call, "The 4th Dimension".

Re-using materials is an effective way of modelling.

A small jailhouse with an optional stone foundation.

Cardboard mock-ups allow you to "measure twice and cut once". No wasted material here!

The small jailhouse begs to be placed on an island like a miniature version of Alcatraz.

Personalize your builds.

More "4th dimension" modelling. Recycle, recycle, recycle.

Think in a creative fashion. Talk to a family member when you reach a problem in your project. They may not be modelers but they may just have a creative idea to offer!

Don't forget the details...and be sure to have just the right tools for the job!

Seaside scenes offer us elevation changes.

Two modules in one!

Love those highly detailed drawings as offered up in this old Campbell kit.

Cardboard mock-ups sure make a difference. I wanted to create this angled and truncated farm house of an HO scale hospital raffle layout. Planning ahead in cardboard made all the difference.

With the added bracing this structure managed to "hold its own" in the scene!

Thanks to Rick at RSLaser for this beautiful kit. I enjoyed kitbashing a family business from the initial rectangular structure.

I built the "Lyon Concert Hall" from a Rusty Stumps I.O.O.F hall. I then placed it on a diorama. I also chose to scratchbuild an "L" addition on the side of the building. Walt at Rusty Stumps saw what I was doing on-line and sent me some additional supplies to create the new area of the building.

A subtle touch with that indent and scratchbuilt loading dock.

Modelling for friends is a lot of fun!

Platform and station foundation built from scratch. The square is a Godsend.

Everything fit...even the platform. What about the outer buildings? Chris asked Mike to paint them as well.

This is my most recent HO build, the Tidewater Wharf from Builders In Scale. The buildings will find a home on Professor David Gardner's layout. Five pages of superb quality drawings come with the kit.

This was a month of evenings to build the four structures. The diorama materialized in one 24 hour period!

Love that entrance.

The plans were to perfect scale. The boat repair shed was the largest structure in the kit and the most time consuming.

What about the seawall height that came with the kit? It did not match the height of the land if you wished to have the boat ramp lead down to the water. Because these buildings will be removed from the diorama and placed on David's layout, I purposely did not let the boat ramp touch the water pour.

A look at the back of the structure. I like the lumber racks and the brick office extension.

The lighthouse is the signature feature of the diorama. It began with two simple discs.

A simple piece of cardstock was all that was involved in the wall structure of the lighthouse. I've used masking tape to keep the lower disc holding onto the wall as the glue sets.

A last overall look.

This is one of the first models I ever built after I entered the hobby. Yes, I know it's crazy that I was scratch building before I made many plastic kits...but I didn't know any better! I wanted to create a structure with variety in elevations.

The little shed was created from popsicle sticks with the lines carved with an X-acto knife.

I am lifting off the roof to show you the man way down below lifting off the roof to show the young lad below the model railroading within "that" building! Just like sitting in a barber chair looking at reflection upon reflection in the mirrors on both walls!

Sometimes you get inspiration from other modeler's layouts.

Let's tackle scratchbuilding and craftsman kit construction in O-scale. The image above shows the reverse of normal. Normally the structure is the kit and the interior details are often scratched. In this instance, the machines, engine, boiler and shop heater are the kits inside the shop and the main structure of the building is scratched!

Those SAMAN furniture stains sure came in handy here.

Brett Gallant at Sierra West Scale Models did an amazing job with the machine offerings.

Tons of detail in those machines!

As I was building the machines, friends on the "Railroad Line Forum" group were adding input to my submissions. Here is what Brett messaged my way.

Doug had built machines #1 and #2 and the boiler. I finished all of the other items.

Simply beautiful models.

Lining up the machines on Doug's scaled floor plan.

The drawings and instructions in the manual were excellent. Check out the number of details in the 24" engine lathe alone! For the 36" vertical drill, I had to basically morph into an octopus to join all of the sections together. I built this machine up in a series of sub-assemblies.

Another nice comment from Brett. Mike's comment is too funny!

Two more little puppies from the litter.

Jim sends in a comment regarding the machines along with a nice little joke!

Yup, O-scale nonetheless...they are still pretty small, yet packed with tons of detail!

Russ, who runs New England Brownstone had this commentary for me!

The machines are now done. Time to begin construction of the shop. I stained the floorboards before glueing them to the base. This results in greater variance in their appearance.

It was a simple matter of building atop Doug's drawing to create the framing of the long wall.

Stripwood of differing widths accounted for the "board and batten" appearance. Doug's favourite colour was applied to the boards in washes.

My SAMAN stains came in handy when it came to the wall sections as well. I had to take care when adding the washes that they didn't "bleed" onto the nice blue tones on the other side of each wall section.

My turn to create a scaled drawing. We finally settled on a 22" overhang after I had drawn a variety of versions with different overhangs.

The assembly line approach worked well in fabricating the series of required rafter sections.

With every step of the way, you are considering other aspects of the model. There's a bit of kitbashing going on with the shop doors...taking into consideration those upper window bars!

Momentarily shoring up the model before removing the rafters once again.

This was a critical point in the planning. I had to ensure that the belting from the machines would not hit one of the cross beams of the rafters. This meant that a couple of the machines had to be shifted ever so slightly on the shop floor.

Love the added details from Sierra West Scale Models. Doug purchased a couple of other additional packages of details from Brett.

It's interesting to note that the two shelves in the lower picture are actually two different scales.

The interior is starting to take shape.

Joining the boiler to the shop engine through metal piping was a challenge. Having to work "off-site" from the shop floor I had to be very careful when sliding the conjoined parts into place!

A later stage was joining the water tower to the machine shop.

I wanted belting that would stand up to the test of time. I quickly discarded the idea of simply painting paper as I knew that it would warp over time with the humidity differences in our Canadian seasons. Sure, belts do sag in machine shops but the sag would appear too exaggerated in any miniature scale. In the end, Doug and I settled on Tyvek material and it has stood up for over a year of seasons now!

Just how does a machine shop work?

Because we are modelling 1912 in rural Ontario, electricity has yet to arrive the scene. Therefore kerosene lanterns light up the shop. After I had them in place, one lamp was burnt out...so the gentleman is bringing another lamp from the office for replacement. (It would be impossible for me to change out the lamp hanging from one of the shop pillar posts.)

My methodology for hanging the working kerosene lamps.

Safety is a must in any industrial setting involving machinery of any kind and the people in 1912 took safety very seriously.

Styrene is useful for scratchbuilding as it is easy to scribe and cut!

An interesting observation from Mike in West Virginia.

With the machines complete and the shop complete, it was time to go to work on the diorama.

In total, 96 individual projects were worked on over the span of this project.

A quasi night scene.

Solder comes in handy to represent the hosing between the welders and their tanks.

We remember Peter Nesbitt fondly.

Working in O-scale allows you to bring in some nice looking mini-vignettes.

Love those Berkshire Valley wagons and horses!

Nice to see Doug handling some of the modeling as well. Great going, Doug!

There's nothing like scratch-building to get those creative juices flowing.

Using styrofoam to build up the coal pile sure saves on my coal supply! Mike built the coal bins from scratch as well using wood, styrene for the bracing and nut/bolt washer castings for added realism.

Doug and I liked the look of the Model Tech Studios crane and we even added further detailing to improve its appearance and its performance!

Mike didn't want to dirty up that lovely ore wagon...but because it is an ore wagon...well...it should appear dirty! Big grin! Doug was happy.

Close up of the Berkshire Valley models.

More wagons and horses.

This kit really surprised me with how it stood up to the test of time!

A bit of paint "touch-up" and the lettering turned out lovely!

A drone view.

The overall scene is 26" x 47".

There is still some work to be done in order to complete the scene but Doug and I are seeing the light at the end of the tunnel.

Let's examine some incredible structures in large scale in the great outdoors. The buildings in these two images were built from scratch.

As were these two bridges spanning the gap.

Train operations run from ten in the morning to lunch time. Crews arrive at 9:00 AM to set out equipment. A BBQ lunch follows the session.

We alternate equipment from one week to the next.

Most of the structures remain outdoors all summer. The bridges remain in place throughout the winter months.

I'm running a train when I am not in the dispatch booth!

We welcome visitors from far and near.

Some more nice looking structures. Why is the mine called Fallentree Mine?

Now you know the rest of the story! Luckily no one was outdoors at the time and luckily the tree just brushed against the corner of Fred's house!

More examples of nice looking structures, one in my honour. What a pleasant surprise that was!

The depot at Craig Leigh was also built from scratch. All of the stone buildings were constructed using a mold ordered from England. The mold could only make about six stones at a time. It was a slow process and many of these buildings were made during the off season.

Some very special ones.

Doug's version at his own layout south of Ottawa on the Rideau River.

Love that scratchbuild trestle, Doug!

Running trains in the great outdoors is healthy!

Here I am dispatching the railroad.

More great examples of structures, one on Barry's layout up in Belleville, Ontario.

The Cedar Rock Branch.

We are excited to announce that the second section of our article is appearing thise week in the on-line magazine called Garden Railroading News. We even made the cover shot!

Thanks so much for following along in this clinic!
Remember, you also have many talents that you can share with your firends and your greater community! A "talent" only truly becomes a "gift" when you share it with others!
All the best, Mike Hamer, Ottawa, Ontario, Canada