The Machine Shop Modules Get a Freight House
We're back at it with our O-Scale Machine Shop series of dioramas. My friend, Doug, had ordered the REA Depot at Cranberry for one of our scenes.
The depot will serve as a freight shed on our fourth diorama.
Doug offered to build up the walls along with their respective doors and windows. He did a great job on this part of the build.
Doug then asked me to complete the build by constructing and shingling the roof and adding the roof details.
Here is the finished build under incandescent lighting.
I forgot momentarily that we are creating a diorama based in the first decade of the last century in rural Ontario.
Therefore, there was no need for me to install the lamps around the building! Yikes!
Certainly, around 1905-1910, electricity had been invented and was in use...mainly in urban areas. In the rural Ontario town we are representing, electricity would not have made it there as of yet. So-o-o, I removed the lamps, one of which you see above.
Here is the photograph of this great looking structure from Bar Mills on the box top.
Doug chose to colour the structure in similar colours to my Boston and Maine railroad...maroon and depot buff as opposed to green and cream.
There is definitely tons of character in the structure!
Art Fahey at Bar Mills tells us he was inspired to bring out this kit after seeing this building located on George Sellios's fabulous Franklin and South Manchester layout.
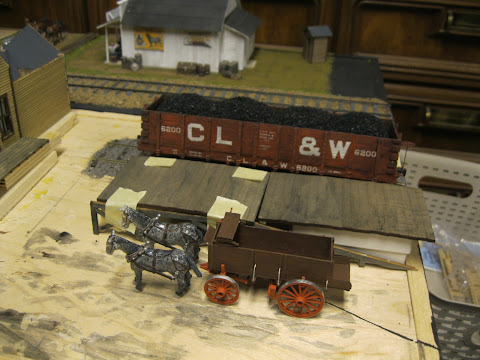
Let's go back a few days, shall we! This is the fourth module in the overall scene. Here is the freight house as Doug had completed it. I had recently finished the gondola and the ore wagon with its horse team. The loading dock came as a kit with a ramp which you can see mocked up to the right and sloping off to the edge of the diorama.
Doug and I have decided to eliminate the ramp. I have rested the platform atop a small white box to offer up a potential view of the extended ramp.
I have taped the various roof aspects atop the structure.
The freight house will have to be raised for its deck work to match the height of the loading dock.
Doug and I intend to bridge the loading dock with the deckwork around the structure down the road.
Doug also brought along a sign typical of the time period. I've simply taped it up to the machine shop.
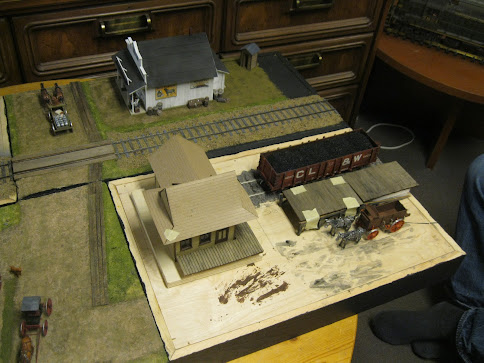
The four modules, all requiring work still.
It's fun to snap a few pics of the "overall" look.
A lower angled offering.
Looking down the track the other way.
Aerial shot.
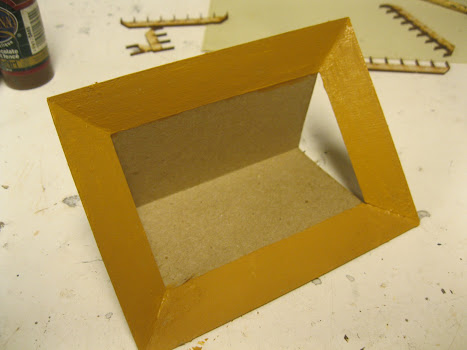
Time to take apart the supports for the loading dock and ramp. As mentioned, we will be eliminating the ramp.
I have taken the two support sections below the elevated dock area that was not supporting the ramp and have joined them together.
Then I began scratchbuilding the other side of the ramp.
Complete.
The two supporting sides have been glued to the deck and my weights help to keep all things in place as the glue sets.
Lower view.
The side supports are in. Now its time to create more lateral supports.
One lateral support is placed at the end of the loading dock.
Earlier, my trusty mini-clamps come in handy holding the angled supports to the legs while the glue sets.
All of the laterals are in place.
Et voila!
Don't worry about the curved lower roof section on the freight house. That will be worked out when I go to attack the roof. The horses have delivered the ore wagon to the loading dock while Jake the dog awaits a ramp to be constructed bridging the freight house to the dock. That will come in time, Jake!
Another view with the gondola on the main.
Aha! That's better! We have the gondola in place on the spur track beside the loading dock.
The spur will act as a team track.
The four modules.
Coming along nicely!
Let's get on to the roof! The instructions in the kit recommend that your body develops a third arm and hand to assist in the construction of the roof. Too funny...but the instructions were almost right! This was a tricky procedure.
I have taped the roof in place momentarily to allow the glue I ran from below to set. I believe the term for the lower roof section that juts out atop the office area is called a "bonnet" roof.
The shingling that comes with the kit.
Seeing as this is the Bar Mills "Depot at Cranberry", why not a complementary cranberry colour to go along with the name! I will start with the SAMAN stain, "Spice".
Nice!
Then I will run a wash of acrylic "Heritage Brick" over top.
The upper ridges showcase this.
The peak for the main office is now glued together nicely so the masking tape is removed.
Time to add the rafter tails.
The tails are now tucked in place and glued.
They jut out just below the roof line.
I painted beneath the bonnet area of the roof.
Time to glue the rafter tail sections in place beneath the bonnet.
I cut a square opening for the chimney. Rather than cut it out entirely, I bent the lower section creating a small shelf. This allows me to comfortably rest the chimney atop the shelf.
The chimney fits like a charm.
The rafter tails are now in place.
A look from below.
Nice!
Looking good so far!
The roof over the storage area is tucked in nicely.
Another view from below!
Time to begin shingling. I like the variety found in the colours of the shingles.
Yes, the adhesive works very well when you remove a strip from its backing...
...but I still add a touch of glue to the roof as a "failsafe" move.
Note how I have angled the ends of each strip to the left in order to fit the angled roof.
It's a bit challenging tucking the shingling in beneath the eaves of the bonnet.
Continuing onward!
Working the other side of the storage shed area.
I always extend the roof beyond where it ends. Then it's a simple manner of cutting the entire side at once.
As seen from below.
The storage area is complete except for the ridge cap.
A view, once more, from below. I have now added trim up under the eaves.
Trim is added here as well.
While many craftsman structures have the rafter tails showing beneath the shingles, Doug would prefer they not show. So, to compensate, I scratch built one other course of "roofing" around the entirety of the bonnet.
The additional course is now in place. I don't have to be too accurate with this as it will be hidden beneath the shingling.
An aerial view showcasing the enlarged bonnet.
That'll do the trick!
I always run a plain course along the base level and shingle directly above it.
This showcases how I use a pencil mark to determine the appropriate angle cut.
The first two courses are now in place.
I knew that there would be a gap between the office end walls and the bonnet. I simply cut a length of stiff cardboard and will install it where you see the gap.
I then ran some of the basic course right up to the clapboard siding.
Further shingling.
Time to "scratch" the ridge cap.
The caps are now in and I am running another wash of the Spice stain.
Under incandescent lighting.
Under fluorescent lighting. Note where the two walls join. To hide the gaps I simply created a corner trim and painted it the maroon colour to match the other trim pieces.
That's better! The new trim piece is tucked in place.
I have now added the vent.
I'm liking this!
A view from above.
A view from the side. Later on, the ore wagon will be weathered and the horses will be hitched up to it.
Yet another view.
My puppy, Lilly, says "hello there"!
Check in soon for more updates on this fun build of the four modules!
You will see how Doug and I have attacked the scenery.
The above image is me in studio with my band's lead singer, Adrienne.
All the best, Mike Hamer, Ottawa, Ontario, Canada