What's Old is New
Our machine shop diorama comprised of four individual sections gets a gondola!
Check out this fun build I've just experienced of a Labelle Gondola in O-Scale.
To view the images in larger format simply click on the picture and to return to the default look of the page, click outside the image.
This is a very old kit I've just completed.

Its' vintage matches the horse and buggy and the REO Box Truck nicely.

Same image with gondola in focus due to depth of field limitations on my point and shoot camera.

Why the title, "What's Old is New?"

Well, this is a Labelle wooden kit most likely from the 1960's.

Indeed, it is very old.

But...it's "new" to me!

I have never built a piece of rolling stock in kit form of this age before.

The time frame for this particular project was "off and on" at the workbench for a week.

The colour selection is boxcar red with a brighter appearance.

I could have painted the car black or other darker brown tones found in freight cars...

...but Doug rather liked this colour choice.

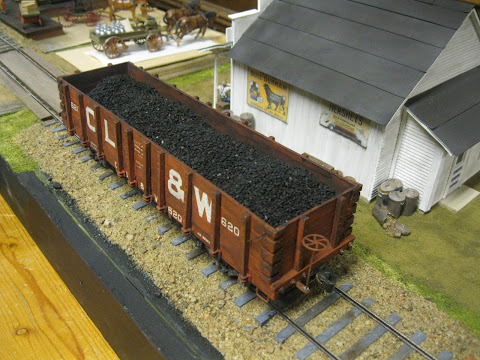
These images showcase the car along the tracks of the modules that are still "in progress" as far as scenery elements go.

I've dumped my entire "stash" of coal into the car for the time being. I will later create the coal bed from styrofoam, then paint it black and sprinkle coal atop in order to preserve much of the stash.

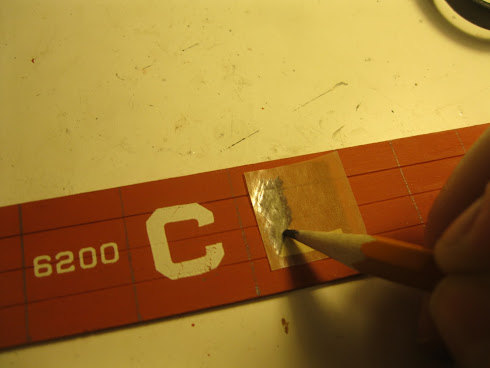
Notice how the ancient lettering was a bit "crumbly" especially after a wash was applied to the car.

A simple "touch up" with acrylic paint of a matching colour fit the bill nicely here!

The car as it appears empty of coal

The fourth quadrant of the diorama is currently at Doug's home as he is building the freight shed, team track and loading dock.

Let's head back to the beginning. Here are the schematic diagrams for Labelle freight cars. The drawings are exactly half-scale...so all I need to do is take a measurement off the diagram and "double it" to get the exact measurement on the model.

Some of the materials with lettering stencils that will need to be burnished on to the car sides.
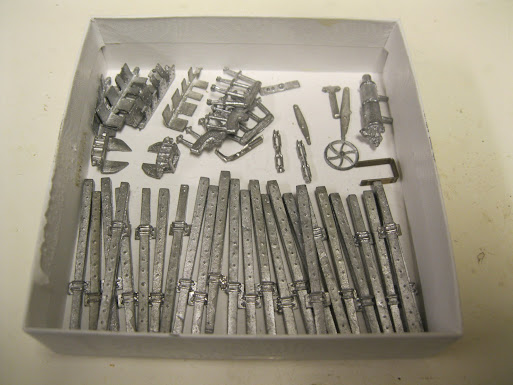
A host of white metal beauties! The multitude of stakes will all need to be cut down to size!

The process begins with some painting.

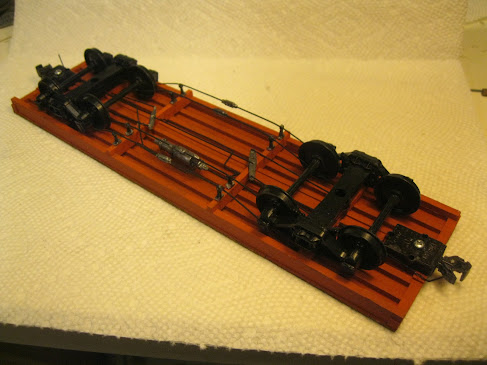
We investigate the underbody of the car.

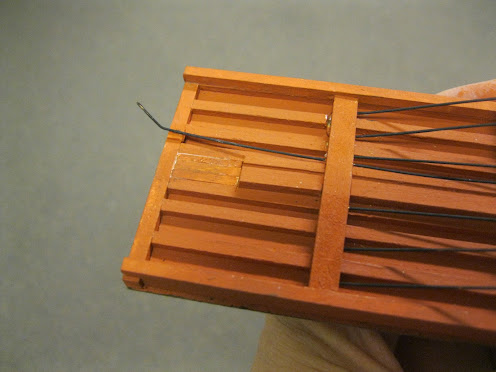
Creating recesses by notching the beams for the truss rod filler pieces.

Marking the hole locations for the truss rod wires. The filler piece will then be turned 90 degrees..

Drilling the holes for the truss rods.

Enlarging the openings.

Labelle offers up nylon to be used for the truss rods, so here I am conducting a "test fit". The nylon, of course, will be painted and weathered.

Cementing the side sills to the car body.

My trusty clamps come in handy.

These are plastic mini-clamps I purchased at Canadian Tire, a well-known Canadian hardware store.

Applying the glue for the planking.

Three sheets of planking were required for the job with a little left over.

I stained the planks with SAMAN furniture stains which you can purchase in small bottles. I used the colour called "Golden Wheat". I then applied a wash of black acrylic paint over top to highlight the details in the planking.

Ah yes! As I make progress with many of my models I like to take a "wee break" away from the workbench and photograph them in their incomplete stage.

No, the model will not end up becoming a flatcar. It will be a gondola!

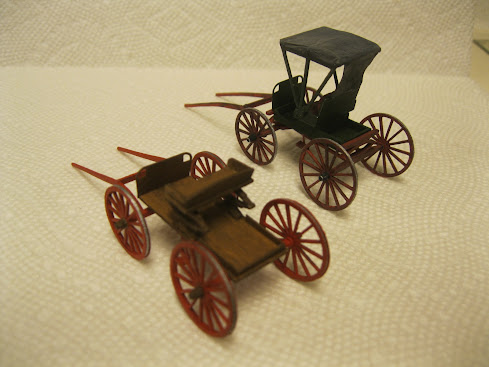
But...I couldn't resist placing two recently completed projects, the early 1900's buggies on top for delivering to town...without being tied down - egads!

I will have to make a blog entry on the two builds of the buck wagon and buggy in the near future! Big grin!

The wagon with standing horse.

Hmmm...perhaps with that satchel, the wagon may very well belong to a doctor!

The buck wagon with walking horse.

I will create a driver for this wagon.
Two wagons are better than one!

And...two horses are better than one!

This farmer will eventually be carrying milk in the wagon.

Then, of course, we had this little puppy.

I wonder how many horses he has?

Back to the topic on hand, I make very good use of my small "squares" in my modelling to ensure right angles.

The queenposts are white metal castings.

I cut them from their sprue and filed their supports enough to fit in small holes in the Needle Beams.

Drilling the holes.

The queenposts go in.

The length of nylon will go through the holes in the beam and then will be tucked into the queenpost concave bed and superglued in place.

Here you see the process.

The truss rods are all in and painted black for the moment. They will be weathered later. Note the four turnbuckles now attached to the truss rods.

Again, another fun image on the diorama.

The kit does not come with trucks nor couplers. It does come with two coupler pockets however, but I will not use them.

Indeed, rather than using the pockets that come with the kit, I simply "Robbed from Peter to pay Paul," and borrowed the couplers (and trucks) from my only O-Scale plastic car, a Maine Central 40 foot boxcar.

I am checking to ensure the correct height.

Seeing as I only have two trucks in total, I've had to place the ends of the two cars on blocks for the height test.

The air brake hose goes in.

The air brake cylinder/reservoir is now in place.

Since only one wire came in the kit for external parts, my trusty stash of old cut up guitar strings sure does come in handy. The strings come in various sizes.

The two cylinder levers are now in place.

This was the trickiest part of the entire build and took many "trial and error" attempts before the piping held. I am joining the air reservoir to the main line. This is just a small segment of wire used from my guitar strings, but it had to contain a 90 degree angle and be held in place with patience as the superglue "set". I used a short length of basswood to assist here.
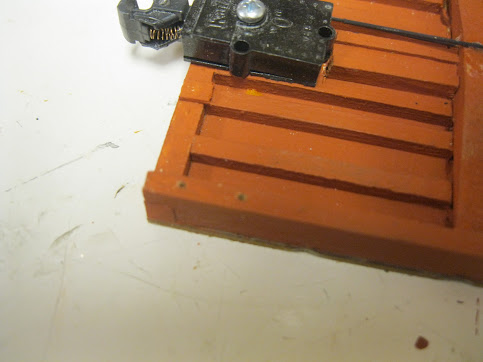
I've added wood in the crevice where the coupler pocket screw will attach.

Phew! Done!

At least the underbody details, now with the addition of further piping.

My "borrowed" trucks which are unweathered.
I will weather them eventually before the project is done.
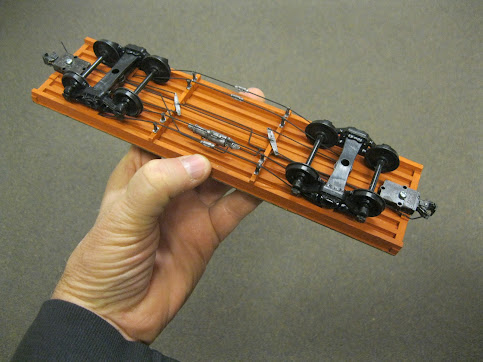
Another view.

And...another.

Looking good!

I told you I'd weather the trucks! (Big smile!)

Love the look of all that paraphernalia below the car body!

Again, the schematic drawings are exactly half-size for the full car.

So, as mentioned earlier, all I have to do is take my measurement from the drawing and double it to apply to the model pieces.

Here I am marking the stake locations.

I'll do the lettering before I glue the stakes on the sides.

Remember, these stencils are well over 50 to 60 years of age.
They hold up pretty good...although I will definitely need to do some touch-ups!

Sanding the side edge to ensure the flooring meets the sides nicely.

Making the corresponding markings for the lower section of the stakes.

Four staples came in the kit for the stirrup steps. I had to cut them down to a more manageable size.
The holes are drilled for the steps.

One step is now in place. Three more to go!

The square comes in handy once more!

A quick mock-up to see how things appear with the wall just resting precariously atop the floor.

The stakes look good. The side of the flooring will be painted to mathc the car side.

A side view.

The washer bolt casting centers come five to a sprue. Like the queenposts, their supports will have to be filed down to fit in the tiny holes I will be drilling on the car ends.
Five in place on one end.

The corner braces or corner brackets have to be cut as well.

Before I place the brackets on the corners, I snap a couple more images on the unfinished diorama.

Looking good in my books!

The corner hand grabs are next on the agenda. My trusty guitar strings offer up the wire.

The needle nose pliers ensure I get perfect 90 degree bends as shown in the two images above.

And...placed on the car...along with the corner brackets.

The hand grabs will be painted.

The end stakes are on the menu for now. I've measured their exact location as per the schematic.

A three quarter angle view.

And another. Note the handbrake and brake staff.

A closer end view.

From above with incandescent lighting.

From above under fluorescent lighting.

I'm liking it!

Looks good from above.

Three of the four diorama segments with so much work left to do!

Lovely. Looks like the farmer is either delivering milk or picking up empty cans. The horse team and wagon will be removed from its base and glued directly onto the road in time.

We spot the gondola between the machine shop and the station.

The late Peter Nesbitt had built the O-Scale station. He did a magnificent job!

Every small rural town needs a general store! This was a Blair Line kit and a lot of fun to construct.

I knew I had a bag of coal somewhere.

So, I've dumped the entire bag into the gon! Yikes!

Of course, as I've mentioned before, I will create a styrofoam shape for the coal, paint it black and sprinkle a light dusting of coal atop to give the illusion of a full carload...which will allow me to retain much of my coal back in the bag! Crafty, eh!

Two previously viewed photos...offering a final look at the car with the foreground in focus.
And...with the gondola in focus.

Thanks for checking in on my machine shop build.

Things are progressing nicely since these last two images were taken.

When I'm not modelling you may very well find me with my '72 Fender Stratocaster in my hands!
Stay safe and healthy everyone!
All the best, Mike Hamer, Ottawa, Ontario, Canada