Tidewater Wharf
Johnson's Sailmaker Building
I've just completed this gem of a kit. It is one of four structures that make up the Tidewater Wharf diorama from Builders In Scale.
I am building this beauty for my friend, David Gardner, up here in Ottawa, Ontario, Canada.
David is in the process of creating a wonderful model railroad that will house a branch line down to the seaside.

Here is the front elevation of the structure. The kit is in HO scale. I have recently been working in O-Scale so going back to HO was like working in "N" for me! Big grin!
You can enlarge images by clicking on them. Return to the default look of the page by clicking outside them.

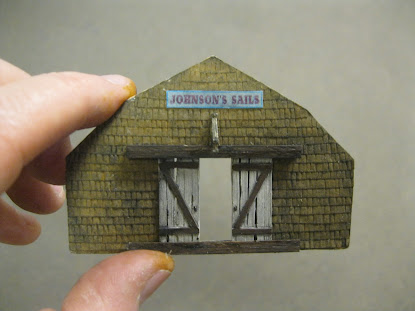
We view the front of the Johnson`s Sailmaker building under incandescent lighting.

As mentioned, this is an HO scale offering.

It begs to be heavily weathered due to its location seaside in the salty air!

The walls are board and batten.

Lots of quality details go into the making of the kit.
As always, I like to create a "clean" workbench to begin a new modeling project.
Here is the image of the Tidewater Wharf from the box side.
The top of the box showcases the lighthouse and the boatbuilding shed aka the "repair dock".
In this closer view you can see the diner and the sailmaker's structure in back.
The Johnson's Sailmaker structure is the focus of this blog posting.
Here is the diner that will butt up against the Johnson's Sailmaker structure.
We view the back of the repair dock.
A look at the overall diorama. While I will build the four main structures, I will not be creating a diorama due to the fact the structures will be going on my friend, David's layout.
One of the five schematic drawing sheets which are highly detailed.
The instruction manual with detailed text and some diagrams. I expected to see more images of the build progress in these instructions, but few were there.
The wooden parts for all the structures.
The ramp casting for the repair dock with the pilings and wall.
Roofing shingles.
The lighthouse wrapper for the outer wall of the building. Shingles will be placed atop the circular wall.
More pilings and retaining sea walls.
The box of many detail parts and some roofing.
Signs, roofing material, brass details including lobster pots.
Cardstock for the Sailmaker Building.
The diner will be constructed later and attached to Johnson's Sailmaker.
A tiny baggie of the Sailmaker wall sections. Let`s get started with the build.
The contents of the bag.
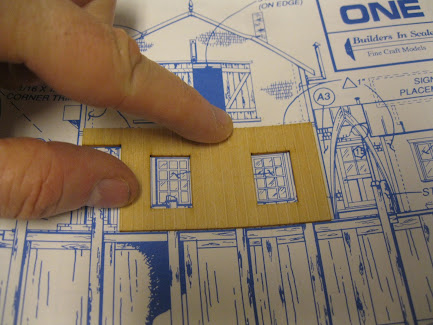
The drawings are "to scale" allowing me to fit the wall sections atop the drawings.
A perfect fit.
Bracing is key to preventing the walls from warping.
The front lower wall.
The exposed side wall.
The side wall that will accommodate the diner.
Time to colour the wall sections. SAMAN furniture stain "Spice" will do the trick. I will use two coats to attain the desired colour.
The first coat goes on.
The rear wall.
Some of the bracing on the lower front wall segment.
A second coat goes on. The bubbles from the stain you see will be brushed away.
The desired colour. I will run a wash of black acrylic paint over top to help weather these wall sections.
Time to paint the windows and doors. FolkArt "Parchment" will complement the colour in the walls nicely.
The wall sections laid out side by side.
Windows and doors are now in.
Looking good, I say!
Blinds have been added behind the windows.
I painted a small portion of white paper a sage green colour for the blinds.
While there is nothing in the instructions for a ground floor, just an upper floor, I chose to add a ground floor to help strengthen the structure. I also added additional bracing where the floor and walls meet.
The upper floor goes in as does the sign on the side wall.
I really like the look of the denim blue sign against the spice colour of the walls.
One of the window castings including an air conditioner which I painted and weathered.
Some scribed siding was placed in the kit to act as finished roofing located below the overhang out front.
My trusty mini-clamps help out here as the glue sets.
Time to deal with the entranceway.
A red acrylic paint called "Brick Red" did the trick here with a touch of dark brown to highlight some individual bricks. That's not a mistake in the top right corner...it's the location that will fit beneath the trim on the front wall...thus some paint had been removed following the "test fit".
The structure thus far under incandescent lighting.
Under flourescent lighting. Brown acrylic helped to detail the front door.
Time to deal with the upper front wall. The scribed lines act as a guide for the shingles.
A "test fit".
Also time to cut out the four-sectioned roof and scribe along the designate fold lines.
Another "test fit" for the look thus far.
Under flourescents.
The shingles come in a long roll on a spool.
They have an adhesive that you wet with a brush.
I go one step further for security. I add glue to the wall section seeing as the shingles are quite old.
Tad-da!
I want to have the doors up top opened slightly so I created a "roughed up" floor large enough to be seen from outside.
The sign and the pulley go in.
A view under incandescent lighting.
The other side from the 3/4 angle.
Now under fluorescent lighting.
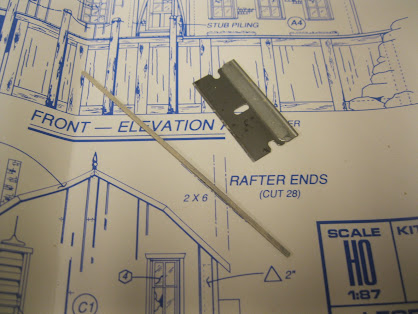
Rafter tails help finish off the roof.
The template helps here when 28 rafter tails are required to complete the job.
I first penciled the markings on the other side from the diagram.
Time to glue them in place.
All 28 are in.
The corrugated roofing is very shiny and new. We must weather it heavily seeing as this structure resides by the seaside where the roof is pounded by salt-spray on a regular basis.
The chimney is in.
Cutting the corrugated segment to fit around the chimney.
A roof cap is completed which makes space for the two decorative finials.
The roof sure does appear grey. No problem, the weathering comes next!
In tackling the roof colour I used PanPastels and Aim Powders. Why the black spots at this moment in time?
Simple. After I painted the corrugated material and let the paint dry, I began the process of applying pastels and powders. In some instances, little (almost microscopic) specs of the shiny metal showed through in a number of locations. When snapping pictures under lighting, the specs "pop out" like stars in the night time sky! Yikes! So, black paint covers these tiny issues. Grey was later applied over top the entire roof once again.
Then it was time to re-apply the Pan Pastels. This process is more like creating a masterpiece painting that would hang in the city's art gallery! Big grin!
These PanPastels are awesome.
I began with the colour "Burnt Sienna".
This was followed up with some brown "Dark Earth" Aim powders.
Finally, an application of PanPastel's "Paynes Grey Extra Dark" was brushed atop in certain areas. This colour is almost "black" in appearance.
The process underway beneath warm incandescent lighting.
Same step in the process beneath fluorescent lighting.
The landing was scratchbuilt with basswood. The landing and stairs were both white metal castings.
A "wash" of black acrylic darkens the pairing. A few touch-ups will be required.
The telephone and mailbox are painted and weathered.
The exhaust pipe goes in.
As does the lamp.
The back external stairs. (That section of corrugated roofing will be glued down further.)
The railing is in.
Against a white backdrop there is one more step with the roof.
That involves glueing down the lower edges of the upper corrugated panels.
While the gaps between the panels appear large, in real life you don't even notice them...only in the close-up photography.
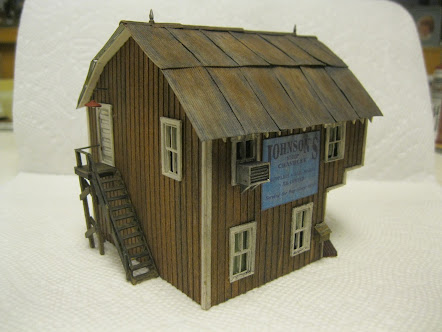
The first structure of four is now complete.
This was a three-day project.
I like the colour choices.
When the sailmaker's building eventually finds a home on David's layout, it will certainly add a great deal to the overall scene.
Perhaps a boardwalk will be located out front.
At dusk, with the sun low on the horizon, the colours will "pop" out at you!
This ship's chandler build was a joy for this model railroader.
Next step, the diner that will be attached to this building.
The diner will butt up against the empty wall to the left below the exhaust pipe.
Thanks to David for asking me to build this wonderful kit. Tomorrow is a new modelling day when the diner will start to take shape!
All the best, Mike Hamer, Ottawa, Ontario, Canada


No comments:
Post a Comment