Tidewater Wharf Seaside Diner
After having completed the first building for Tidewater Wharf, the Johnson Sailmaker's building, it was now onto structure number two, the Seaside Diner in HO Scale.
The sign that comes with the kit calls the diner the "Lighthouse Cafe & Gift Emporium" where you can dine with fine ocean cuisine and pick up a souvenir on the way out!
The kit tucks up nicely to the Sailmaker building creating a larger singular structure. You have the option of keeping the diner as a separate building, but to me the cafe begs to be joined to the sailmaker building.

The creators of the kit offering at Builders in Scale had once visited a diner where they observed a boat as an entry to the cafe so they couldn't resist offering this mini-scene for their structure! I love the idea!
Remember, you can enlarge the images by clicking on them.
Return to the default look of the page by clicking outside them.

This structure was a short two-day project at the workbench and will certainly add to the seaside resort town at the end of David's branch line.

Under incandescent lighting we find the two structures adjoined.

As seen under fluorescent lighting conditions.

Front elevation.

As I mentioned in my previous posting for the Sailmaker building, a nice boardwalk in front of a seawall will look great here when we go to plant the structures on David's layout!

The rear of the two structures.

The rear from the perspective of the sailmaker building,

Aerial shot.

The schematic drawings were very useful when figuring out various locations of bracing and other details.
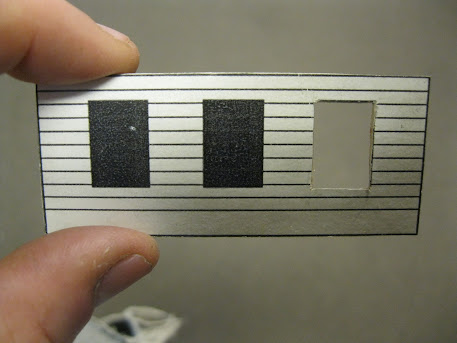
Using a razor blade and X-Acto knife I began cutting out the sections for the windows and doors.

A test fit of the windows. They will be straightened when glued to the wall.

A test fit of the door.

All eight sides of the diner placed in a row.

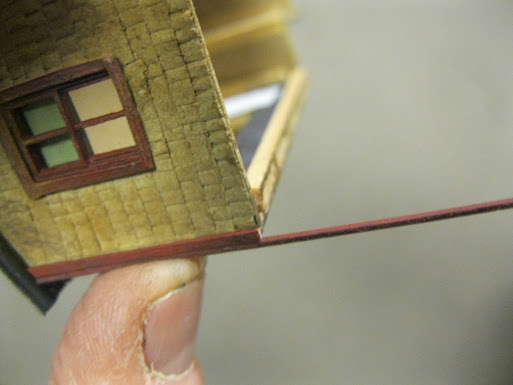
Time to glue the shingles onto the wall. Even though there is already an adhesive on the backing of the shingle strips which you wet with water, I also applied carpenter's glue to the wall ensure a strong bond.

Cutting and placing the shingles between the windows.

The excess on the edges will be cut with scissors when the shingling is complete.

The excess in the windows will also be cut out as has already been done in the left window.

Looking great!

Love it!

Here are the colours I used for the walls, windows and doors as well as the roof. I chose to paint the diner with Boston and Maine colours (my railroad) of depot buff and maroon. Folk Art "Country Twill" worked for the tan colour and Delta Ceramcoat "Maroon" gave me the red for windows, doors and the sign atop the roof (which you will see later). FolkArt "Patina" worked delightfully for the roof which you will also see soon. Americana "Heritage Brick" (not shown) worked for the chimney.

The rear wall offers two vents.

It's a simple matter of cutting around the drawing when applying the shingles. The round vent is slighty larger than the drawing so it will cover the white area showing.

Here is that optional wall where you can shingle if you wish or you can simply butt it up against the wall of the other structure (Johnson Sailmaker).

The wall strategy begins. The instructions have you simply work your way around the building.

Even though very limited bracing is suggested I always "over" brace. While I had no "L-girder" sections for an interior "outside" corner, this T-section will do the trick.

Note how the T-section worked for the "outside" corner on the interior.

With the walls all in place, the roof was then dealt with. I first painted the roof sections with the FolkArt "Patina" colour. I then applied some PanPastels to the roof in the brown and rust colours...even a touch of black. I then applied a "wash" of water over top and used paper towel to brush off most of the wet powders revealing a nicely weathered patina effect.

Coming along nicely.

As I worked on the sign supports I simply used a section of basswood to act as a measurement device.

Time for the trim.
The trim was painted maroon to match the windows and doors.

The "Lighthouse Cafe" sign is glued atop the roof along with the chimney and a small exhaust pipe camouflaged by my index finger.

The finished diner with the end wall about to butt up against the larger building.

The rear of the diner.

The finished pair...and what a great pair they make!

Low angle shot.

Love that boat entranceway!

Two structures are now complete in the Tidewater Wharf kit. Next step, the boat building/repair shed!

Here I am on the right with Professor David Gardner on the left. David has retained his goatee while mine was shaved off at the end of "M"ovember as the month of November is when we all grow Mustaches in support of men's cancer initiatives.
I would like to take this moment to thank David Gardner for asking me to take on this build. I would also like to thank Carl Lindon for his encouragement and his master work in assisting David with the trackwork, design and wiring of his layout.
Check in soon for my third build in the project, the Boat Building/Repair Shed.
All the best, Mike Hamer, Ottawa, Ontario, Canada
No comments:
Post a Comment