Tidewater Wharf Boat Repair Shed
My third structure project in this "Builders In Scale" kit is the boat repair shed.
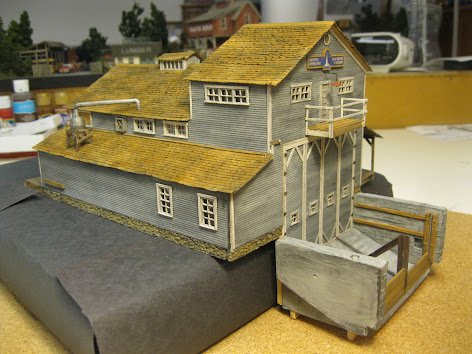
I have momentarily placed the shed on styrofoam with black construction paper for photographic purposes.
This four-kit project is meant to go on a diorama, but because it will be planted on David's layout, I offer this "Rube Goldberg" land form to suffice for the time being!

"Builders In Scale" calls the structure, "Rickett's Repair Dock and Boat Builders". It is the largest building of the four in the kit.
Remember, you can enlarge the image by clicking on it.
Return to the default look of the page by clicking outside the picture.

The first eight years of my 40 year teaching career found me teaching in a remote northern fishing village where a similar boat building shed was in existence, so building this structure was a very special experience for me!

We find the slip heading down into the water. David will have to determine if the tide is "in" or if the tide is "out" when we go to place the structure on his layout.

A brick office offers up variety in wall sections.

While the structure is rectangular in nature, it is not a true rectangle of four simple walls with two parallel pairings. Not at all, as sections jut out "here and there" throughout. This created challenges in construction. I overcame the challenges by bracing, bracing & bracing! Just as "location, location, location" are the three key words in real estate, "bracing, bracing, bracing" are the ones for craftsman kit construction and scrath-building!

I like the lumber storage area out back.

I've added the previously built "Johnson's Sailmakers" and "Lighthouse Diner" to the scene.

Indeed, this will make for a lovely seaside scene in my books.

An aerial view.

As you can see, I chose to go with similar colour tones in the walls of the boat shed.

Here is the juxtaposition of the four buildings in the kit. David may wish to place them in some other configuration when we determine the best location on his layout for them.

Here is the full structure in pieces in the little baggie.
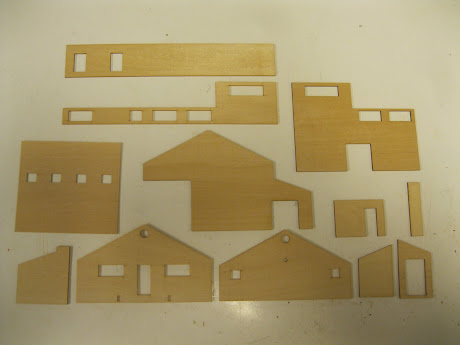
An overall look at the wall sections that will eventually make up the kit.

It's a "perfect fit" on the schematic diagrams.

Layering of end walls.

I use my "monster" tool which acts as a scriber for the wall sections to add character to the clapboard.

I will brace the walls in short order. Hunterline Weathering Mix "Light Grey" begins the colouring efforts.

Then, a wash of black acrylic darkens the wall's look.

I painted the windows and doors an off-white colour called Parchment.

Time to address the brickwork for the office.

I first painted the entire brick wall a light grey colour with acrylic paint. Once the paint has dried, I ran a red marker over top the bricks. Note how the red ink does not bleed into the mortar area.

Looking good.

I then painted the stone foundation a mud colour. Once dry, I ran a wash of black acrylic paint over top the entirety of the wall sections and the stone foundation to allow details to pop.

The white metal windows were slightly larger than the opening so a bit of filing came in handy.


Time to test fit the front doors.

My pencil lines will aid when I go to glue the trim over the door sections.

I'm starting on the trim which I have already painted the off-white colour. I am able to cut the sections directly atop the drawings.

Voila! Done!

Time to create the sign which you see at the top left. Because it is not a perfect rectangle with square corners I must be very careful when cutting it out.

The signs is now in place with the other door, vent and windows.

The supports for the balcony.

Drilling the hole in the white metal casting for the lamp shade.

The front wall is complete along with its foundation.

Time to concentrate on the slip, or ramp.

The rails that guide the vessel up into the shed or down into the water.

Side supports.


I have run a wash of black acrylic overtop the concrete slip and now will lighten it slightly with grey PanPastels.

Coming together.

The guide is in.

I have added some of the removeable wooden panels.

I'm really liking the look!

The additional bracing I have added.

The long side wall is added along the left hand side along with some trim. A rainwater pipe will hide the little gap.

The taller wall is added along the right hand side of the structure.

A test fit of the roof which will be built up atop the cardboard.

The back wall goes in.

A view from above.

Time to construct the office with the brick walls.

Ensuring things are square.

A length of wood acts as the foundation beneath the side clapboard wall with the sliding door.

The SAMAN stain "Golden Wheat" coloured that length of wood.

Two office walls are in. This image illustrates the fact that the building is not a true rectangle.

I like how the slope line of the office roof works with the rest of the structure.

The loading dock on the left side of the structure now begins to materialize.
Basswood was stained and weathered, then cut.

Lining up the planking.

Nice!

Looking good!

This offers a potential location for a railroad spur. Another possible area for the spur could be along the back wall, 90 degrees to the left wall.

The roof supports under construction.

Now glued to the loading dock.

Under different lighting.

The build is coming along nicely at this point.

The roofing goes in on the canopy above the loading dock.

It will be rolled roofing with an angled section that will butt up against the side wall.

View from above.

Once again, a three-quarters view from the side.

I must remember to offer up a platform on the interior to support the two roof sections.

A check of the fit for the office roof.

Shingling the office roof. Even though you simply apply a brush of water along the sticky backing of each roof segment, I add glue to the main roof as a "failsafe" option.

I first painted the roof a honey brown colour.

I added some grey and then brown PanPastels for weathering.

Coming along nicely.

That interior support is in as well as the rear wall loading dock and the little entranceway that juts out from the back of the facility.

The rear is coming along.

The entranceway door goes in.

Time to paint and weather the corrugated roof for the canopy over the lumbewr storage area.

I first painted the corrugated material a grey colour. Then I ran washes of the SAMAN "Spice" furniture stain and of the acrylic black.

Still wet, but looking how I want it to be!

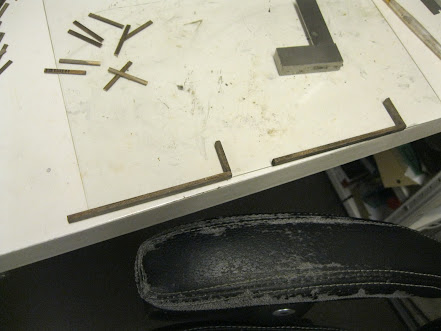
These templates are awesome! They make for ease of construction.

The canopy support for the lumber rack area.

The schematic showcases the lumber rack area.

I'm building the components directly atop the drawing.

A piece of masking tape holds the structure in place.

One down, two more to go!

Glued in place.

A trio!

Under different lighting we see the new lumber on the rack.

The corrugated roof goes in place.

It's fun having different roof combinations on this build!

I've simply placed the tall chimney above the corrugated roof.

Time to create the sign. I've glued it atop a piece of stiff cardboard.

I've cut the cardboard out and have added some stripwood framing for the sign.

My trusty mini-clamps hold the sign in place as the glue sets.

The build thus far!

Creating the small entrance way stoop.

The boards run out from the doorway in a 90 degree direction from the planking beneath the lumber storage area to the right.

The roof and supports now in.

Time to focus on the main roof.

Thankfully, lines are drawn atop the card for each roof section.

Once again, even though water drawn along each shingle strip ignites the glue on the undersurface, I still add carpenters glue to the actual roofing card in a thin spread.

Coming along...many strips to go!

The roofing is resting temporarily atop the structure.

I still have to create the ridge cap.

Cool!

Before glueing the roof in place, I ran lengths of basswood for two purposes; to have a greater glueing surface for the cardstock roof as well as adding additional support to the overall model.

Off-white trim now goes in along the angled roofline.

More trim up top.

I have glued the cupola together. These were all white metal parts.

It's a nice fit!

While the roof is yet to be glued in place, I have checked the fit of the chimney which rests atop the corrugated and pierces the upper roof. I have also installed the decorative piece below the peak and the round vent.

I will use an old brown paper bag to create the ridge cap that will run the length of the roof areas.

I actually make the fold before I cut out the ridge cap. It is so much easier to do so before cutting out the cap. If you cut the narrow cap first, it is much more challenging trying to fold the thin length of paper.

The ridge cap is now in place but will need to be painted to match the roof colour.

The support for the cyclone vent is next on the "to do" list!

Again, I am building directly atop the diagram.


Resting atop the lower roof.

Checking the fit for the cyclone.

Drilling the hole to accommodate the piece.


A view of the cyclone vent from the side.

End view.
Three-quarters front view.

Time to create another lamp.

I've drilled the hole, added the wire and dipped the end in some glue to help create an imaginary bulb.

The lampshade is painted red and appears over the sliding door to the right.

Looking good, I say!

Alongside the Sailmaker's building and diner.

Aerial view! Now...my next task will be on to the final structure of the four, the lighthouse!

That's little old me in the middle between two of my many bandmates on a cold, fall day up here in Ottawa. Yikes!
Be sure to check in on my next project!
All the best, Mike Hamer, Ottawa, Ontario, Canada
No comments:
Post a Comment