Clinic on Preparing Walls in Craftsman Structures
Recently I offered an on-line clinic to the St. Lawrence Division of the NMRA up here in Ottawa.
The theme for the day was preparing the walls for your craftsman structure and how to take your modelling to the "next level".
Click on any image to enlarge and click outside the image to return to the default look of the page.

No...WWW does not stand for the World Wide Web...for the purposes of this clinic it represents "Working With Walls". This introductory image outlines the presentation.

Indeed, retirement from 40 years of teaching is glorious...although I enjoyed every moment of my career. I also experienced 40 "Meet the Creature" evenings over time. I always shared this image with the parents as an ice breaker...originally on overhead transparencies then on my interactive SmartBoard.

No...I'm not an old geezer hitting up the mothers of my students. Yes these two lovely ladies are indeed mothers of two of my students in one of my last years of teaching. They are very special...seeing as I taught both of them back in grades 2 and 3! Yes, I' have been around long enough to teach the children of the students I once taught!

My clinic was delivered the day before Halloween. I always dedicate my presentations to someone or to a group of individuals. Today I dedicated this presentation to the many teachers and staff I worked with over the years as well as the students and their families. A special dedication is for my colleague, Casey Delaney (in the grey jacket) who is a true survivor having been struck by a motorized Seadoo on the Gatineau River on Canada Day a short while back. She was in grave danger for a long time but I am happy to say that she is back teaching kindergarten and I have the joy of working with her when I go back in to supply teach on the occasions when I am needed.

Now...on to the presentation. I have a length of O-scale clapboard to experiment with. If you wish to have a "new look" to the structure you are building then simply paint "full strength" which you see I have done for the Blair Models General Store I am making for my friend, Doug Matheson.

Doug wants the store to look new, but we have both realized that we want to weather it "ever so slightly". Yes, the signs that came with the kit and the ones I created off the internet serve to add interest as do the figures. I will repaint the figures and tone them done slightly as well.

The shack you see in the bottom image was all white, just like the general store. I weathered its walls near to the ground quite heavily with washes. I will do something similar with the general store...only not as weathered.

If you wish to have your building appear as if it is "in use" as my friend Doug coins it...then a series of washes or light painting will do. You can also add nail holes should you wish to have that look. I typically don't add the holes. Some kits like the Bar Mills Depot above have them already added to the walls as well as the wainscoting. If I were to paint "full on" I would obliterate these details.

On my test piece I am adding nail holes with a very sharp awl and the aid of a small "square". In HO and N you could use a pounce wheel like the ones shown in the two bottom images.

Since I delivered my presentation I received an e-mail from a very good modeller and friend of mine, Bill Crago, regarding nail holes. The contents of the e-mail mention something very interesting when it comes to nail holes in clapboard siding. You can read what Bill sent on the image above. Most informative! Thanks Bill!

Nail holes or not...the debate rages on! (Big grin!) Note the wall sections from that Bar Mills "Whistlestop Junction" depot which I have painted carefully in two tones...the colours of the Boston and Maine Railroad.

I'm often impressed with the "tight and compact" containers many of these craftsman kits are shipped in! This is my completed diorama I called Milepost 27 after Club 27. There is a musician standing on the station platform with his guitar case nestled up against the depot. He is ready to board the train and it is my hope that he does so safely and reaches mileposts 30, 40...80, 90 and beyond. For you see...the members of Club 27 are all famous musicians who died at the age of 27. Check it out on-line...there are over 100 musicians in this infamous group!

Nail holes or rust. Note the two rows of what appear to be the remnants of the rusted out nails just to the right of the window on the lower shed. This mill is over 200 years old and the picture was taken over 100 years ago! Even though the structure is old, you can barely discern any nail holes.

Note, too, the lighter tones on the lower portions of each length of clapboard on the lower section of the main mill building just adjacent to the water wheel. This is perhaps where rain and other elements have faded the paint and even the wood.

We go to the front of the structure where we can study the varying wall arrangements. There is horizontal clapboard on the shack and the front of the main building. Note the large barn boards hanging vertically. We can also see the great looking stone foundation. These are walls too!

How to achieve the dilapidated look? Well, I've never modelled this look before so I do not have an actual model to show you, but my friends at the Library of Congress have plenty of images I am allowed to share freely with you! Isn't that one dilapidated building! So-o-o...let's try to emulate the look on a "test piece" of O-scale clapboard.

I scored and gently lifted the clapboard in a horizontal fashion with my razor blade. I used my X-acto knife to carve away the lower sections of some of the clapboards. I even left some material dangling. I also cut a couple of end boards using my razorblade at a right angle to the clapboard as a test.

This image showcases the various looks.

Now...onto modelling the dilapidated look. I first painted the wall board grey as a primer. I dabbed on rubber cement with a skewer stick all over the test piece. After the cement dried (half hour or so) I dabbed on my paint colour of choice...in this instance, white. (I could've used, red, blue, yellow...any other colour of the rainbow). Then I used my monster scribing tool given to me by my buddy Ron Newby to score some more lines in. Ron and Chris Lyon had seen one of these devices while watching another clinic quite a while ago now. While not pictured here, I rubbed along each clapboard with my finger adding quite a bit of pressure. This pulled off some of the rubber cement which you want to do revealing some of the grey primer left beneath.

You could also use masking tape for a bit to do the same. I then added more texture with my X-acto blade. Next step was to drybrush down in a vertical manner to highlight the lower area of each board as we had seen on that water mill earlier. The bottom left image shows this. The look I wanted to achieve was to the lower left in that images as my desk lamp has "blanched" the same image to the upper right where the paintbrush is shown. I then ran a light wash of SAMAN "Golden Wheat" to add more character.

To better tie things in I ran 80-grit sandpaper along the lengths of the boards. It's coming together nicely. I then used my watercolour pencils to mark the boards near ground level, browns to show the dirt splashing up and greens to show where the grass and weeds would rub up against the lower walls. Finally, I ran the black watercolour pencil along the bottoms of each clapboard to add shadowing. I will tone this down slightly with another wash. What I love about this hobby is the tremendous amount of sharing of ideas and techniques that goes on among modelers. It was my good friend, Chris Lyon, who introduced me to the watercolour pencils after I watched a great tutorial clinic he had put on recently. Thanks Chris!

You can see the brown and green tones near the base of the wall. Then I experimented with the same process, this time opting to leave more of the white paint on the walls. I mention Crackle. You can purchase this product at your local Michaels store. You use it to create the look of peeling paint. I haven't had the opportunity to use it as yet. If it works out for you, let me know!
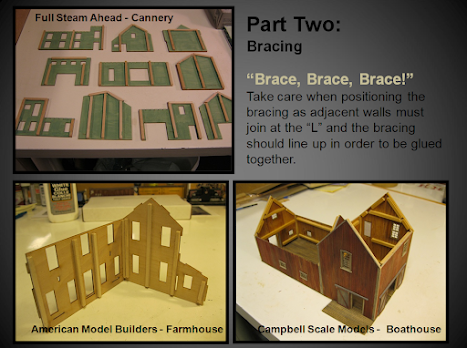
In real estate the three key words are "Location, Location, Location", right Kevin! (Big smile!) Well the same can be said for structure building...only change the word to "Bracing, Bracing, Bracing". The text in this image reminds us to take great care in selecting the location of your bracing as they must line up properly at the inside corners of your walls. So-o-o...on one wall the bracing is glued right at the edge while on the adjoining wall you must "indent" your bracing one "brace width" in from the edge. This will allow for a nice snug meet and when you glue the walls together you will have some great glueing surfaces to ensure your building will remain a solid structure for many, many decades!

I purchased these weights at a facility in an industrial park near my home here in Alta Vista, Ottawa many moons ago. They have come in handy for my various modelling needs. When I glue the bracing on my walls, I place a weight on top and let the glue set overnight. Say, I love that large scale "heavyweight" passenger car too!

It's fun to be a bit silly and creative in your modelling and here I have stacked on my wall sections under a series of weights overnight. The railroad with the heavyweights belongs to Fred Mills here in Ottawa, Ontario and it is a blast to operate each Saturday morning!

The weights come in handy when laying cork for track, for laying track, for adhering station platforms and road surfaces to my dioramas. Lots of great functions for them here!

To attest to the long-held belief that bracing truly is important...well, my Troels Kirk Cannery's wall sections went together so well that the Cannery is still in existence to this day serving the local fishermen. The cannery salts the fish and acts as a canning plant with the cans going out the back of the shop by rail.
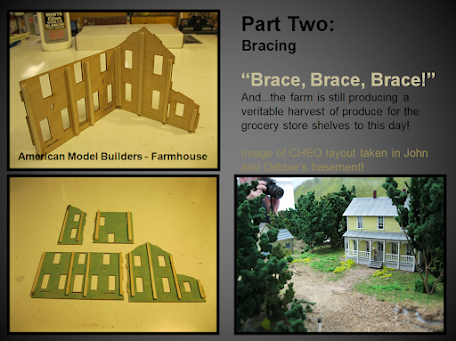
Our farmhouse which I built for a local hospital layout that a group of very dedicated modellers worked on still stands to this day where the farm continues to produce food products for the local community.

Effective bracing techniques have allowed the Dexter's Dinghies facility to exist where the family owned business offers affordable boat rentals for cottages in the region.

Two of these builds made it on to dioramas which I've called after songs my band plays...with Dexter's Dinghies housed on the "Black Water" diorama named for that great Doobie Brothers' song. I love playing the guitar solo in that tune! The cannery is housed on my "Blue Bayou" diorama named after that old standard of a musical selection.

The two main purposes of bracing are listed above.

Let's investigate painting. If you wish your structure to appear "very new" then conduct a "full on" paint job as you see in my three projects above. For the restaurant, I wanted the stucco to appear as very recently done so I gave it a "full on" coat of white paint. The farmhouse looks great in that lemon yellow colour and Diane's Quilt Shop is a very cherished model named for Stan's partner, Diane, who was an exceptional quilter. Sadly she passed away a few years ago. When I researched quilt patterns and brought some into a Word document for printing to use in the window, Diane was able to tell me the actual name for the three patterns hanging there. You can only see one quilt from this angle. I based the building loosely after my own home here in the Elmvale Acres neighbourhood of Alta Vista. I have that Cape Cod roof style with the dormers.

I've always loved the character of the RSM tobacconist shop and I wanted it to appear relatively new and brandished with all of those great looking signs. The roof belies the fact as it has already seen a few repairs. The shop actually existed in downtown Toronto quite a long time ago. I loved building the rooftop billboard signs. Learning how to create them allowed me to scratchbuild many more over the years for various structure projects.

This Rusty Stumps IOOF Hall I turned into the Lyon Concert Hall named after my good friend, Chris Lyon. Because the hall was about to have its "Grand Opening" it had to be a new looking structure. The line-up for tickets formed days and days in advance of the opening...so much so that the people fell right off the diorama and I had to create a new street with a sidewalk to house them! The structure also serves as Walt's Warehouse (named for Walt Gillespie, the owner of Rusty Stumps Scale Models) and Charlie's Chocolates in back.

This was a "Group Challenge" build on-line at the Railroad-Line Forums group. You had to take a structure and change it up a bit. When Walt at Rusty Stumps saw my plans to create an "L" addition he e-mailed me to say he would be sending along extra wall material including additional doors and windows. Originally I was going to have the addition be "flush" to the rear wall of the main building creating a single, lengthy back wall, but I got this brainstorm to "indent" the "L" addition about a fingernail width from the main structure's back wall adding so much more visual interest! Then I scratchbuilt the loading area and had a spur line reach down to the loading dock.

If you have a model with the nail holes and some wainscoting already added to the wall sections then you do not want to brush your paint on fully as you will fill in all of the gaps. For the depot you can still detect these items as I gave a "light" brushing of paint to the wall surfaces. Likewise with the Rusty Stumps model I brushed lightly so as not to obliterate the wall boards. A simple, light wash of black acrylic paint with a lot of water allowed for those wall boards to "pop".

These two projects were given a lighter paint job along with some sanding on the lower green section of the machine works in the bottom image. These inch thick models are great for shelf layouts where an owner may not have a large space in which to model.

Sometimes the kit itself will offer up a dilapidated appearance simply by building it and painting it as per kit instructions and the little green shack in the upper picture attests to this fact! For the freight house I simply weathered the lower boards on the walls at the loading dock level and at ground level to "age" the structure. For my scratchbuild of my legion hall on my HO scale Boston and Maine/Maine Central layout I distressed a few boards and lifted some of the roof shingles. I've always loved the look of a structure hanging out over an embankment where the various storeys flow down the slope.

These three shacks came in the Bar Mills "Shack Pack" kit. I'd like to draw your attention to the red structure. While driving out to my friend's farm for a jam session with the band I saw a red barn that had a more "cherry" red appearance and it was aging. To achieve the aged look I offered up a "wash" of red. I then added a second wash downwards over some of the boards...and then a third over a few. Finally, when these washes were dry I gave a light wash of black acrylic paint to "pop" the lines between the boards. I also opted to "sway" the roof...an option in the kit instructions that adds character.

A brief look at washes...when you want that "in use" look...or the dilapidated look. For a wash I put a little dab of paint on my brush and then dip it into the water. Then I run it along my wall boards. You see that this is still a rather light pass.

The single pass is above. A second pass took place in the lower left image and a third wash, this time with black, appears to the lower right. This is the look I wanted.

The image above also shows a "full on" paint of the same blue colour. Typically this application would obscure all the nail holes. (I most likely made my test nail holes too large!) Big grin!

I conduct all of my washes with the walls on the flat surface. The same goes for any signs, in this case a three-dimensional sign with the large tuna attached. The windows and doors are darker but are also weathered. Some signs saw a light wash of black while others stayed clean.

Here is another application of the metal weights. They work to keep the wall sections together as the glue sets.

The finished building!

Let's investigate the use of stains for colouring walls...most effective I say!

I use SAMAN furniture stains and Hunterline Weathering Mixes. I have this "test" piece with one pass and two passes to act as a guide.

The 40 choices of SAMAN stains. I would like to once again thank Chris Lyon and another friend, Ron Newby, for introducing me to the notion of using these furniture stains to colour building walls and roofs.

The seven I have on my workbench are starred. You can also mix these stains together to form alternate tints that you like.

Just like my washes with acrylic paints I brush the stains on lightly.

Let's check out each structure individually.

The information for each is listed in the captions for each image.

The cedar shake walls really stand out beautifully.

While there may be subtle differences between tones, you can see these subtleties nicely.

It was a joy using the furniture stains on these little structures.

The SAMAN stains came in handy when colouring the floors and interior walls on my latest project, the machine shop in O-scale. The floors used the "Golden Wheat" furniture stain while the walls were coloured with "Colonial". A wash of black acrylic paint delineated the boards nicely.

The machine shop under different lighting.

The Mount Albert Scale Lumber "lumber shed" I built came alive with a wash of Hunterline's Weathering Mix "Light Grey".

So did the lumber storage shed. I used the medium brown colour as well as the light grey here.

George Dutka was kind in letting me use this photograph he took at the Paris Train Show way back in 2012. Note the variety of Hunterline Weathering Mixes on their display table.
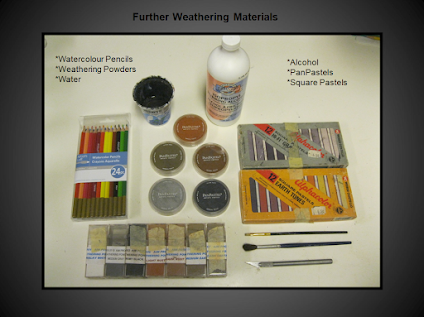
These are all of the weathering materials I use in my modelling not to forget acrylic paints as well.

Another tool I simply have to have in my arsenal are these squares. I have a small pair, a medium pair and a large pair...totally six in all.

They come in handy for so many purposes!

Yes, I typically glue together end walls to side walls first and let the glue set overnight.

Then I join the two "L's" and, voila, you've got your structure!

This grain elevator I built for a good friend, John Mitchell. John only had a black and white image of the building along with the picture on the box top to go by. The structure on the prototype railroad he models appeared very dark in the image. I chose not to go "black" but "chocolate" instead. Yes, I purchased the SAMAN furniture stain in chocolate!

The hydrocal foundation was painted first then given washes of browns and blacks. Note the appearance the foundation takes on under differing lighting conditions.

Here's the box top and the structure finally placed on John's layout. The spur track serves the industry on the far side of the structure.

Sometime wall sections are not clapboard, barn board, board and batten, etc. Yes, sometimes the wall sections of your buildings are made of cedar shakes and the roof...slate. In this Rusty Stumps kit, the cedar shake walls already came pre-coloured in grey. I added some black by scraping off a bit of black from the square pastel with an X-acto blade then brushed with a very lightweight make-up applicator. Then, to add variance, I dusted on some brown PanPastels for greater effect.

The kit offers lines to guide you in glueing the shakes down. You have to take care around window openings.

Here is an image of the naked wall section and the same section with the cedar shakes in place and the foundation getting its paint job before weathering.
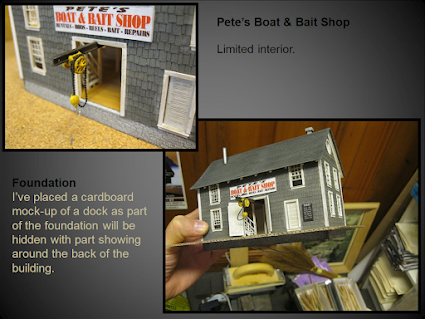
The reason I mention "limited interior" is that fact that I chose to detail only the bottom floor. The foundation will be hidden for the most part by the dock out front. Part of the foundation will be visible in back where the railroad track will meet a loading dock out there.

I "Robbed Peter to Pay Paul" when working on this structure. I mentioned not detailing the upper floor. This allowed me to save the rafter sections to create a great looking load for that gondola in the image at the upper right!

Sometimes you will have an interior where your studs will have to act as bracing.

This is in evidence in the Rusty Stumps "Three Car Garage".

The flooring is concrete so I sprayed it grey and weathered with powders. The cracks in the floor show up nicely.

I added lighting to the garage.

I painted an Athearn freight car box top black and it became the base for the mini-diorama.

Let's check out some signs again. There's my burnishing tool. While this image is slightly out of focus, most of the signs in the picture have been burnished to the walls.

I create some signs on my computer. One thing you must remember to do is your research on certain font styles. Be sure to select a font appropriate to your time period or the year you are modelling!

Indeed, signs tell us so much. The second building in the image to the upper left is "Klinger's Pharmacy" which came in a larger "four kit" offering from Bar Mills. It has interesting walls as well.

I have copied and pasted a series of period ads I found on the Internet to a word document. This allows me to print out the signs in colour in any size I choose to create. Note the Bull Durham sign in two different sizes on different sheets.

Rooftop billboard signs offer so much character and the colour tones in this one complement the yellow colour of my structure I was building for Hamer's Haven, a structure honouring my parents. I first glued the sign onto a wooden backing, then I gave it a frame before adding the supporting framework at the proper angle for the rooftop I adhered it to during the process of this kitbash project..

Yes, after building large rooftop billboard signs that came in a few kits, I was able to build them from scratch later on!

This is the Holy Spirits Distilleries building on my HO scale layout. It's a "play on words" seeing as I am a Catholic school teacher. I wanted the sign to appear old so I sanded the cardboard sign down to "tissue paper thin" consistency then applied it to the wall. Then I dry-brushed the brick colour (red) over top the sign to age it. As for the fire escape, I created it from scratch and it took over 40 hours labour. Just as I finished it I saw an ad in Model Railroader Magazine for brass etched fire escapes! Go figure!!!

I've shared this slide before in another clinic. To paint this craftsman structure depicting an interlocking tower I first sprayed it all the cement colour. I got a revelation while watching my daughter colour her homework a long time ago when she was in elementary school. Could I use her felt tipped red marker to colour the brickwork? Yes! It worked out beautifully! After the cement colour dried I simply drew the marker along over the bricks ever so lightly so that the ink would not run down over the mortar lines! Bravo!

I wanted this roundhouse to appear gritty and grimy seeing as it is in an industrial location. So I gave the walls a heavy wash of black acrylic once the red paint had dried.

I chose an orange-reddish colour for the walls. For the plastic doors, I first painted them a tan colour. Then the black wash brought out all of the highlights in the doors and helped to weather them as well.

Again...the painting and weathering took place with the wall sections on the flat.

The blue structure, "The Gem Hotel" was the springboard for my kitbash honouring my parents. All aspects of this build came from the initial rectangular shaped structure. No additional wall sections, windows or doors came from any other source. If you examine the walls closely you will see where the newly placed wall sections and window came from on the original kit.

I used a cardboard mock-up to determine exact placement before cutting the walls for the kitbash.
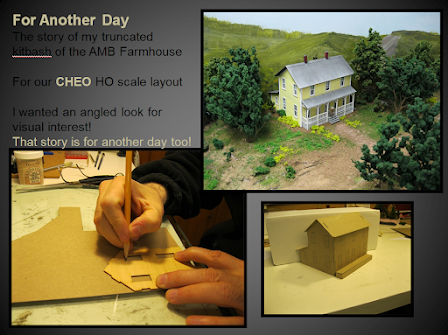
This farmhouse was part of a group build to raise money for our local hospital, CHEO. I challenged myself by deciding to angle the farmhouse and truncate it against the backdrop wall. Of course, I couldn't build the structure and simply saw it down the angle I desired. It would simply fall apart if I attempted that idea! No...all wall sections had to be planned out and pre-cut very carefully.

You always "Measure Twice and Cut Once" when building anything. This is why I mock-up the structure first in cardboard when attempting this type of kitbash. I was very pleased with the result.

This wall addition in resin came from Railroad Kits out of the Northeast of America. I first washed the structure with resin prep and then let it dry before painting.

I felt the addition was too dark so all it took was thirty seconds of rubbing my finger over top the stonework to achieve the desired look.
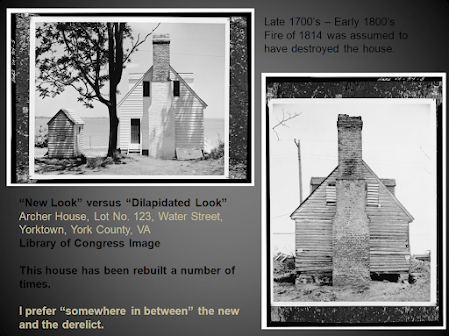
Some modellers may wish to have that "new look" or that "dilapidated look" or...perhaps something in between.

I would typically model somewhere in between the two.

It's wonderful conducting research. The images you find in your search are most amazing.

While these clapboard walls appear newer at first glance due to a recent paint job, they offer up clues as to their age. There are some cracked boards. Some clapboard pieces have the bottom section worn away. Places where nails would normally hold the boards are shown along the edge to the left. Note the discoloured weathering running down the walls where the roof ravines are located. Indeed, images offer up a tremendous amount of information.

Examining an image offers up interesting weathering looks. It would appear that (perhaps) the white paint of the trim at the top of the end wall leached its colour to run down the side of the structure over time. Walls are fascinating. You learn many theories simply studying the walls of buildings. They are rarely square, especially as the building ages. They offer a palette for many other detail items and they certainly aid in offering character to the structure.

Thanks so much for taking the time to read my blog entry offering an account of the clinic I conducted on "Wall Preparation" pertaining to the building of Craftsman Kits.

It's always fun for me to share my various clinics with you! Here I am running a train on Tommy Hoods' massive Canadian Northern HO scale layout up here in Ottawa.
Indeed, with creative ideas you can take your modelling to the "Next Step"!
All the best, Mike Hamer, Ottawa, Ontario, Canada